The NTILE window function in Microsoft SQL Server can be used to rank data in a dataset. This function is definitely worth knowing if you want to learn all there is to know about querying data in SQL Server.
In this brief tutorial, we’ll discuss what the NTILE function is and how it works. NTILE is one of four ranking window functions we have available to us in Microsoft SQL Server. For a full rundown on all the different ranking window functions, check out this tutorial:
SQL Server Ranking Window Functions: ROW_NUMBER, RANK, DENSE_RANK, NTILE
Also, this tutorial assumes you know a thing or two about window functions in general. For example, we’ll be using terms like “window frame” and “window order clause”. If you don’t know what those mean, you should definitely check out my full beginner friendly introduction to window functions, found here:
SQL Server Window Functions: An introduction for beginners
Also, make sure you download your FREE Ebook:
FREE Ebook on SQL Server Window Functions!

This FREE EBook discusses absolutely everything you need to know about window functions in SQL Server, including everything discussed in this tutorial. This EBook will definitely be a great resource for you to reference throughout your career as a data professional. Get it today!
We’ll discuss the following topics in this tutorial:
- What is the NTILE function?
- Setting up some data
- Examples of using NTILE
- Links
Let’s get into it:
1. What is the NTILE function?
NTILE allows us to collect rows in a result set into a specified number of tiles. A tile is just a group of X number of rows. Each tile is given a number, starting with 1 and ending with N.
NTILE is the only ranking window function that actually takes an argument. It’s argument is simply an integer representing the number of tiles you want to see.
It requires the use of a window order clause, and it does not support a window frame. This is actually true for all ranking window functions.
Honestly, the best way to understand NTILE is to look at some examples.
2. Setting up some data
To understand how the NTILE function works, we need to set up some data. If you have been follow along with any of the other window function tutorials, you will already have this data set up in your environment.
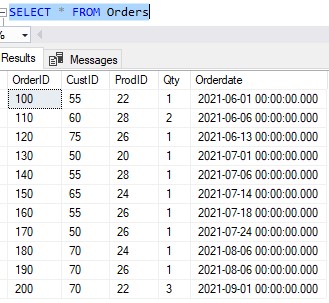
Run this SELECT statement to see if you already have the data:
SELECT * FROM Orders
The data should look like this:

If you don’t have the data, let’s go ahead and add it:
--Create Orders table
CREATE TABLE Orders
(
OrderID INT PRIMARY KEY IDENTITY(100,10),
CustID INT,
ProdID INT,
Qty TINYINT,
Orderdate DATETIME
)

--Populate Orders table with data
INSERT INTO Orders(CustID, ProdID, Qty, Orderdate)
VALUES
(55, 22, 1, '6/1/2021'),
(60, 28, 2, '6/6/2021'),
(75, 26, 1, '6/13/2021'),
(50, 20, 1, '7/1/2021'),
(55, 28, 1, '7/6/2021'),
(65, 24, 1, '7/14/2021'),
(55, 26, 1, '7/18/2021'),
(50, 26, 1, '7/24/2021'),
(70, 24, 1, '8/6/2021'),
(70, 26, 1, '8/6/2021'),
(70, 22, 3, '9/1/2021')
The CustID column represents the ID of the customer who made the Order, and the ProdID column represents the ID of the product they bought. We don’t need to set up data in those tables for this tutorial. I just want you to understand the data we’re looking at 🙂
Ok, now that we have some data set up, we can show you an example of using NTILE.
3. An example of using NTILE
Let’s take another look at the data in our Orders table:

Using the NTILE function, we can collect rows into a specified number of tiles.
As I mentioned before, a tile is just a group of X number of rows. Each tile is given a number, starting with 1 and ending with N.
Let’s talk about ‘N‘ first. When you call the NTILE function, you pass as an argument the number of tiles you want to see. This “number of tiles you want to see” is going to be your ‘N‘ value.
The number of rows in each tile will be X. We determine X using a simple math formula:
X = (number of rows in partition) / (N)
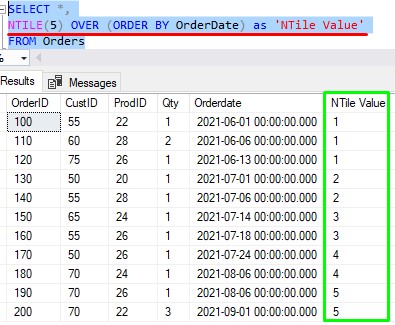
We need to look at an example. Let’s say I write the following query that uses NTILE, where I specify that the number of tiles I want to see (a.k.a ‘N‘) is 5:

Since we didn’t specify a window partition clause in our OVER clause, the entire result set is one large partition.
So again, the number we passed to NTILE was 5, so we see 5 tiles in our result set.
If we remember the formula, the number of rows in each tile is: (number of rows in partition) / (N)
In our case, that’s: (11) / (5), which gives us a result of 2 with a remainder of Y.
Of course, ‘Y ‘ in our case is 1.
I needed to throw in one more variable to point out something else: The first Y tiles will have an extra row in each.
If we look at the result set, we see that since we wanted to see 5 tiles, that means each tile will have a total of 2 rows in it, except for tile # 1 which will have an extra row.
Another example of NTILE
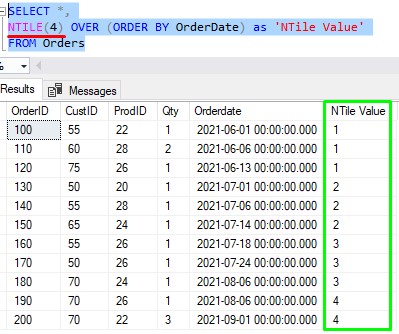
Let’s test to see if you understand. What would the result set look like if we passed an NTILE value of 4?
So that means we want to see 4 tiles.
Each tile will have 2 rows in it, except the first 3 tiles which will each have an extra row:

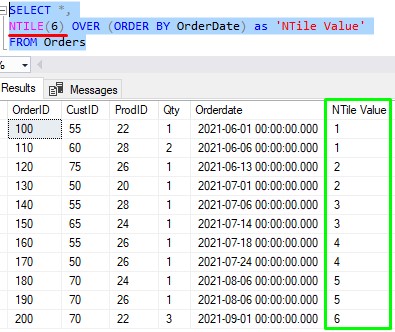
Or what about an ‘N‘ value of 6?:

Each tile will have 1 row in it, except for the first 5 tiles which will each have an extra row.
Get it? I strongly encourage you to try this for yourself. Play around with different ‘N‘ values and see if the result is what you expect it to be.
When might you use this in the real world?
I’ve been thinking about why someone would want to see data presented in this way. What comes to mind is maybe a company wants to see data presented in groups of a percentage.
For example, if I wanted to examine the data in my Orders table, and I want to see data in 20%, groups, I could write the NTILE function using an ‘N‘ value of 5.
I can be assured that all rows in the 1st tile will be the first ~20% of my orders. Rows in the 2nd tile will be next ~20% of my orders. So on and so forth. My 5th tile will be the last (most recent) 20% of my orders.
Maybe I want to extend a special offer to those customers in the first 20%. They helped get my business off the ground, so I want to extend them a special offer of maybe “Half off their next order!“.
But for the next 20% (those people in tile # 2), maybe I still want to show them some love, but not that much love. Maybe for them, they get a coupon for “25% off their next order!“.
If someone has another example for when NTILE would be very useful, I’d love to hear it in the comments!
4. Links
Everything discussed in this tutorial can be found in the following FREE Ebook:
Download your FREE SQL Server Window Functions EBook!

This FREE Ebook discusses absolutely everything you need to know about window functions in SQL Server, including everything discussed in this tutorial. A proper understanding of window functions is essential for anyone looking to enter the field of data science. This eBook will definitely be a great resource for you to reference throughout your career. Get it today!
Next Steps:
Leave a comment if you found this tutorial helpful!
Make sure you learn about all the other ranking window functions available to us in Microsoft SQL Server. You can learn all about them in the following tutorial:
SQL Server Ranking Window Functions: ROW_NUMBER, RANK, DENSE_RANK, NTILE
Also, if you need to understand how window functions work to begin with, you should definitely check out my full beginner friendly introduction to window functions, found here:
SQL Server Window Functions: An introduction for beginners
Thank you very much for reading!
Make sure you subscribe to my newsletter to receive special offers and notifications anytime a new tutorial is released!
If you have any questions, or if you are struggling with a different topic related to SQL Server, I’d be happy to discuss it. Leave a comment or visit my contact page and send me an email!


