If you plan on working with SQL Server for more than 5 minutes, you should expect to encounter something called a transaction very early in your career.
Understanding SQL transactions is the first step in writing well-performing SQL solutions that are less likely to cause data corruption. Transactions are definitely a big part of writing good SQL code.
In this introduction tutorial, we’ll break down what a transaction is and why we need them when writing SQL code. We will discuss the following topics:
- What is a Transaction in SQL Server?
- The BEGIN TRANSACTION statement
- The COMMIT TRANSACTION statement
- The ROLLBACK TRANSACTION statement
- Tips, Tricks, and links
Also, everything in this tutorial is discussed in the following FREE Ebook:
FREE Ebook on SQL Server Transactions!
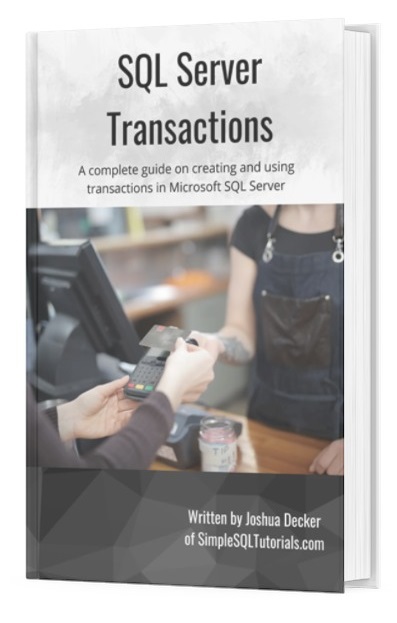
This FREE Ebook discusses everything you need to know about creating and using transactions within SQL Server. It will definitely be a great resource for you to keep and reference throughout your career as a data professional. Make sure you download it today!
Without further ado:
1. What is a Transaction in SQL Server?
A transaction is a block of code we want to succeed in its entirety or fail in its entirety.
Transactions are used when we want to make sure certain code succeeds in its entirety. If some part of the code fails, we make sure everything else in the block fails, too.
To understand the idea of a transaction, we should look at a great analogy.
The bank account analogy
A great example of a transaction is when you want to transfer money from your checking account to your savings account at your bank.
If you think about it, when you do a transfer like this, there are two steps to it:
- Reduce the balance of your checking account
- Increase the balance of your savings account
Let’s think about that for a minute. What if one of those steps failed to happen properly?
For example, what if when you tried to do the transfer, your checking account balance went down, but your savings account balance did NOT go up?
After panicking, and saying a few choice curse words, you’d get on the phone with your bank and open a can of whoop a**.
Now, think about the other possibility. What if your savings balance went up, but your checking balance did NOT go down? In other words, money just literally fell from the sky and into your savings account.
“I mean, I’d be cool with that“.
Me too, obviously, but your bank definitely would not.
When we are transferring money between accounts, we want both steps to succeed or both steps to fail.
If there was a problem during the transfer (maybe the bank lost power in the middle of the transfer), we would rather nothing happened at all than something unideal happened.
In that scenario where there was a problem during the transfer, maybe we report an error message to the user saying something like “Error occurred during transfer. No balances have been modified. Please contact customer support for assistance“.
Folks, this is the idea of a transaction. We create a situation where either everything succeeds, or everything fails. Partial success or partial failure is not what we want!
2. The BEGIN TRANSACTION statement
Let’s actually create our own bank table and populate it with some information. Let’s call our bank Simple SQL Credit Union:
CREATE TABLE SimpleSQLCreditUnion
(
CustomerID INT IDENTITY,
FirstName VARCHAR(15),
LastName VARCHAR(15),
CheckingBalance INT,
SavingsBalance INT
)

INSERT INTO SimpleSQLCreditUnion
(FirstName, LastName, CheckingBalance, SavingsBalance)
VALUES
('Brian', 'Spliner', 2500, 10700),
('Dominic','Torredo',3000,45000),
('Tyler','Durden',200,3000),
('Paul','Haymen',6000,56000)
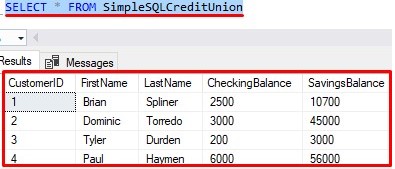
Nice, so we’re tracking some customers, and we can see their Checking account and Savings account balances.
Notice I used the IDENTITY property to automatically populate our CustomerID column with a value on inserts. Pretty slick.
Also, by the way, the INT data type can only store a number less than about 2 billion, so I hope none of our customers want to deposit more than $2 billion in the bank)

But I digress.
Say our customer Dominic Torredo comes into our bank and wants to transfer 2000 dollars from his checking account to his savings account. Let’s split that up into two statements:
UPDATE SimpleSQLCreditUnion SET CheckingBalance = 1000 WHERE CustomerID = 2

UPDATE SimpleSQLCreditUnion SET SavingsBalance = 47000 WHERE CustomerID = 2
Now you know we should probably put this work in a transaction because we want to make sure both statements succeed, or they both fail.
The first step to putting work in a transaction is to open the transaction. We do that with the BEGIN TRANSACTION keywords. We put those keywords before the chunk of code that we want within a transaction. Here it is in action:

You can abbreviate the word “TRANSACTION” to just “TRAN“, like this:

This is how I usually open transactions, and how I see others open them as well. No need to spell out the whole word if we don’t need to!
So now, our transaction is open.
3. The COMMIT TRANSACTION statement
Whenever you open a transaction, you need to make sure you successfully close the transaction when you are done with it. Leaving a transaction open and alive on your SQL Server can cause problems for yourself or others.
For example, there are certain transaction isolation levels that prevent changes to data if someone else already has an open transaction on that table and is modifying the same data. The idea is that maybe we don’t want to overwrite changes someone else is doing!
Be on the lookout for a full tutorial on the different SQL Server concurrency issues that can occur, and how transaction isolation levels work.
But I digress.
We are responsible for closing a transaction when we are through with it.
The two ways to close a transaction are to either commit it or roll it back. We’ll focus on the commit scenario now.
If we commit a transaction, that means the work that was done inside the transaction will be officially written to the database, making the changes durable.
We use the keywords COMMIT TRANSACTION to commit our changes. Here is an example:

Like with BEGIN TRANSACTION, you can abbreviate the word “TRANSACTION” to just “TRAN” if you want.
But also, you can leave out the word “TRAN” or “TRANSACTION” altogether, leaving just the word “COMMIT“.
Like this:

Again, this is how you will likely see it in the real world. We developers are a lazy breed, you see.
To give you even more useless information, you could also use the word “WORK” instead of the word “TRANSACTION” if you wanted to. So the whole thing would say “COMMIT WORK“. I’ve never done that before, nor have I seen anyone else use it, but I guess it’s good to know…
Running and committing a transaction
So now we have a new perfect little transaction. We opened it, put some work in the body, and closed it. Let’s see it in action:
BEGIN TRAN

UPDATE SimpleSQLCreditUnion SET CheckingBalance = 1000 WHERE CustomerID = 2

UPDATE SimpleSQLCreditUnion SET SavingsBalance = 47000 WHERE CustomerID = 2

COMMIT
After running that transaction, let’s take a look at the data in our table:

We can see the transaction ran successfully and committed both changes to the database. Again, those changes are:
- Reducing the CheckingBalance by $2000
- Increasing the SavingsBalance by $2000
4. The ROLLBACK TRANSACTION statement
If you remember, I said there are two ways to close a transaction.
The other way we can close a transaction is to roll it back. Unlike when we COMMIT a transaction, if we roll back a transaction, the changes performed within the transaction will NOT be officially written to the database. In fact, they will be undone.
Of course, this is what we want to happen if part of our transaction experienced an error while executing. The “error” can be some kind of SQL error or maybe some business logic error.
Let’s see it in action. If we wanted to close a transaction by rolling it back, we would use the ROLLBACK TRANSACTION keywords:

Notice in our UPDATE statements, we’re setting both the Checking and Savings balances to zero (definitely NOT something we want done).
Regarding the “ROLLBACK TRANSACTION” keywords, you can use similar abbreviations like we saw with COMMIT. You can abbreviate “TRANSACTION” to just “TRAN“, or leave it off completely and just have “ROLLBACK“, or you can say “ROLLBACK WORK“.
In the real world, I see a mixed bag with this one. Some developers like to be explicit when it comes to rollbacks and say explicitly “ROLLBACK TRANSACTION“, while other developers stick with the short-and-sweet idea and just say “ROLLBACK“. The choice is yours.
Let’s see what happens when we run this:
BEGIN TRAN

UPDATE SimpleSQLCreditUnion SET CheckingBalance = 0 WHERE CustomerID = 2

UPDATE SimpleSQLCreditUnion SET SavingsBalance = 0 WHERE CustomerID = 2

ROLLBACK TRANSACTION

Nothing changed! (Thank God)
The ROLLBACK TRANSACTION statement simply undid everything that happened within the transaction.
The two UPDATE statements ran initially, sure, but their changes were not made permanent. After the two UPDATE statements ran, the data changes were sort-of hanging out in purgatory, if you will. The ultimate state of the data is determined by how we close the transaction. If we COMMIT the transaction, the changes become permanent. However, if we ROLLBACK, the changes are undone.
That is a very simple way to think about it. Behind the scenes, it is truly more complicated than that. But for this introductory tutorial, that is good enough.
I have a full tutorial on the topic of the ROLLBACK statement for you to read up on. Check it out here:
SQL Server ROLLBACK: Everything you need to know
Using a transaction in a stored procedure
Let’s close this tutorial with a better real-world example of when you could use a transaction.
The examples so far are a bit silly. For the ROLLBACK example, we knew the data was bad, and we knew we were going to roll it back. But what if we don’t know our data is bad (like in the real world)?
Let’s create a stored procedure that handles the task of transferring money from someone’s Checking account to their Savings account. Specifically, we’ll create a stored procedure with parameters.
We’ll start slow:
Here is the CREATE PROCEDURE statement for our new TransferFromChecking procedure, with the parameters we want to pass in:
CREATE PROCEDURE TransferFromChecking
(@custID INT, @amount INT)
AS
--some code
We simply pass in the ID of the Customer we need to perform the transfer for, and the amount they want transferred.
Cool, so let’s add our two update statements:
CREATE PROCEDURE TransferFromChecking
(@custID INT, @amount INT)
AS
UPDATE SimpleSQLCreditUnion SET CheckingBalance = CheckingBalance - @amount
WHERE CustomerID = @custID

UPDATE SimpleSQLCreditUnion SET SavingsBalance = SavingsBalance + @amount
WHERE CustomerID = @custID
In our first UPDATE statement, we decrease the CheckingBalance amount by the @amount that was passed in. Then in our second UPDATE statement, we increase the SavingsBalance by that same amount. Pretty straightforward.
But let’s think about where we could use a transaction. Maybe we have a business rule saying we don’t allow the transfer from the checking account if it would reduce the checking account balance to less than zero.
That’s a fairly believable business rule, right?
If the first UPDATE statement reduces the CheckingBalance to be less than zero, we ROLLBACK the whole transaction. Otherwise, if it’s all good, we COMMIT the changes.
Check it out:
CREATE PROCEDURE TransferFromChecking
(@custID INT, @amount INT)
AS
declare @newCheckingBalance INT

BEGIN TRAN
UPDATE SimpleSQLCreditUnion SET CheckingBalance = CheckingBalance - @amount
WHERE CustomerID = @custID

UPDATE SimpleSQLCreditUnion SET SavingsBalance = SavingsBalance + @amount
WHERE CustomerID = @custID
SELECT @newCheckingBalance = CheckingBalance from SimpleSQLCreditUnion
WHERE CustomerID = @custID

IF @newCheckingBalance < 0
BEGIN
PRINT('Transfer would reduce Checking balance less than zero. Transfer cancelled')
ROLLBACK
END
ELSE
BEGIN
PRINT('Transfer successful')
COMMIT
END
We use our @newCheckingBalance variable to store the value of the CheckingBalance column after our updates have been performed. Then we simply see if it’s less than zero, and either ROLLBACK or COMMIT accordingly. Let’s see it in action.
Here are the balances for Dominic Torredo right now:

Let’s try to transfer $5000 from his Checking account using our new stored procedure (this ought to be rolled back):
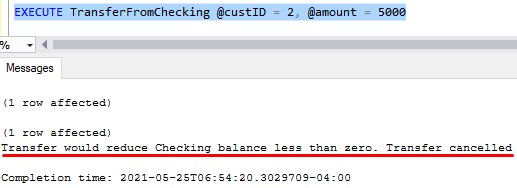
Seems like our code is working correctly. If I check the balances again, we should see no changes:
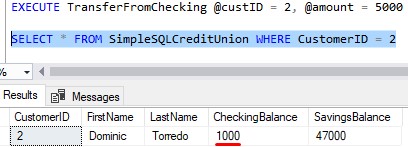
Good. Now let’s do a valid transfer of just $300:
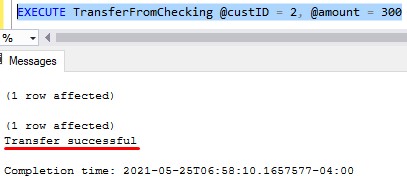
Looks good, now let’s double check our data:
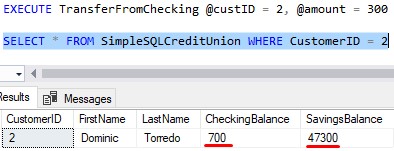
Beautiful!
I must confess, our TransferFromChecking stored procedure isn’t exactly bulletproof. I have actually made a big mistake in the procedure, centered around the idea of needing to issue a ROLLBACK.
I have a full tutorial on the topic of how you should create transactions within your stored procedure. Make sure you check it out after reading this tutorial:
Are you making this ROLLBACK mistake in your stored procedures?
5. Tips, tricks, and links
This tutorial is meant to be a simple introduction to transactions and how they can help us write more reliable code. There is a ton of information in SQL Server related to transactions, but we’ll give you just a few neat tips and tricks that can make your job easier.
Tip # 1: If you don’t explicitly specify transaction boundaries around a transactional SQL statement, SQL Server uses something called autocommit for the SQL statement.
With autocommit mode, SQL Server will run a transactional statement as if it had BEGIN TRAN and COMMIT wrapped around it.
For example, take a look at the following UPDATE statement:
UPDATE SimpleSQLCreditUnion SET CheckingBalance = -3000 WHERE CustomerID = 2
Behind the scenes, SQL Server is really running this statement:
BEGIN TRAN
UPDATE SimpleSQLCreditUnion SET CheckingBalance = -3000 WHERE CustomerID = 2
COMMIT
I just want you to know that if you don’t explicitly wrap your statement around a transaction, it is still running in a transaction. You just can’t see it!
Tip # 2: A very useful system function to know is @@TRANCOUNT
This system function tells you how many open transactions you presently have.
Let’s actually run a query where we open a transaction, but don’t officially close it:

I can even query the data to see that it is “changed” (but it’s not really changed):

Now let’s run @@TRANCOUNT to see how many open transactions we currently have open:
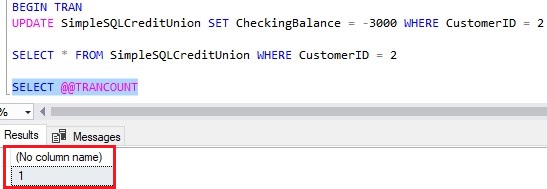
Yep, that checks out. We’ll go ahead and do a rollback, then see the data, then see we don’t have any more open transactions:
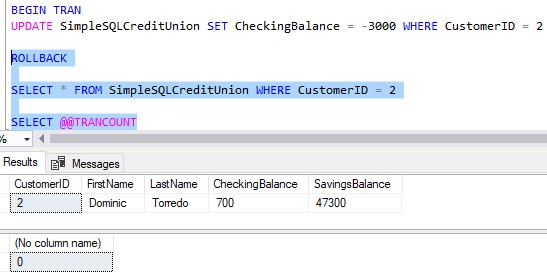
Superb!
Tip # 3: When you leave a stored procedure, the number of open transactions must be the same as when you entered the stored procedure
Let’s ALTER our stored procedure to NOT have a COMMIT at the end:
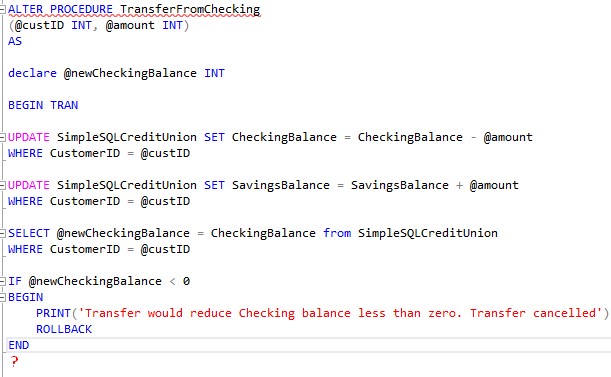
Now let’s try to do another successful transfer for Dominic Torredo:

If we use our handy @@TRANCOUNT function again, we see that we are once again in an open transaction:
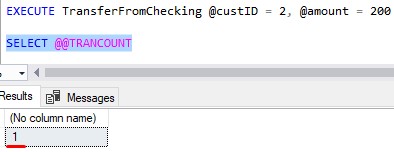
So when we entered the stored procedure, there were zero open transactions. Now, after we have left the stored procedure, there is one. Since the number of open transactions after the stored procedure isn’t the same as it was when we entered the stored procedure, we get the error message!
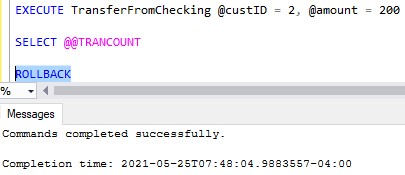
I’ll do a quick ROLLBACK to close the transaction:
Tip # 4: You can name a transaction, which can help you make sure you commit or rollback the specific transaction you want
Here’s an example:

If you want to ROLLBACK or COMMIT a named transaction, you need to throw the word “TRAN” or “TRANSACTION” back in there. You can’t just have “ROLLBACK” or “COMMIT” by itself.
Named transactions are useful when you have nested transactions, as in a transaction within a transaction. If you want to rollback only the innermost transaction, and not the whole thing, you can name that innermost transaction and then do your ROLLBACK TRAN and specify the name. That way the outermost transaction isn’t effected!
Links
Here is a link to the official Microsoft documentation on transactions: Transactions (Transact-SQL)
Next Steps:
Leave a comment if you found this tutorial helpful!
Everything discussed in this tutorial can be found in the following FREE Ebook:
FREE Ebook on SQL Server Transactions!

This FREE Ebook discusses everything you need to know about creating and using transactions within SQL Server. It will definitely be a great resource for you to keep and reference throughout your career as a data professional. Make sure you download it today!
Now that you know the basics of transactions in SQL Server, you should read my next tutorial to understand a few of the more intermediate-level topics around transactions. Take a look here:
SQL Server Transactions: Do you understand these 6 rules?
You are most likely going to write explicit transactions within stored procedures, as I have demonstrated in this tutorial. If you need a crash course on what a stored procedure is and how to write them, you should check out the full beginner-friendly tutorial:
Stored Procedures: The Ultimate Guide for Beginners
Thank you very much for reading!
Make sure you subscribe to my newsletter to receive special offers and notifications anytime a new tutorial is released!
If you have any questions, please leave a comment. Or better yet, send me an email!


