

You will likely find yourself needing to use the capabilities of a cursor to accomplish some task in Microsoft SQL Server at some point in your career as a database professional.
Cursors are the tool we use when working with large amounts of data, where you need to basically iterate through that data to accomplish some goal.
Cursors are the most common application of the WHILE loop we have in SQL Server. Not sure what a WHILE loop is? Check out the full tutorial:
SQL Server WHILE Loop: A decision structure you should know
In this tutorial, we’ll discuss a step-by-step guide on how to write a cursor and how they can help us. We will cover these topics:
-
What is a cursor, and what does it do?
-
Steps to create and use a cursor:
-
Declaring a cursor.
-
Opening a cursor.
-
“Fetching” data for a cursor
-
Looping through a cursor.
-
Closing and deallocating a cursor.
-
Let’s start with the basics:
What is a cursor, and what does it do?
A cursor will let you iterate through rows of a result set, one at a time, to perform work on each row until there are no more rows in the result set.
Again, the way we “iterate” through a result set is through the use of a WHILE loop. The WHILE loop is the heart of our cursor.
If you aren’t familiar with what a WHILE loop is, you need to review this tutorial first:
SQL Server WHILE Loop: A decision structure you should know
We use a cursor when we need to basically loop through the results of a query, from top to bottom, looking at each row and possibly doing some kind of work on the data.
There are several steps to creating, using, and closing a cursor, so the best way to understand them is to look at an example.
Steps to create and use a cursor
Ok, so let’s think of a good example of when we might want to use a cursor.
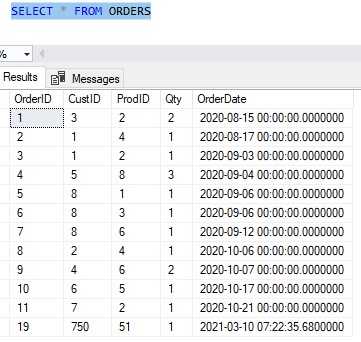
Say you are the owner of a small business who sells wood furniture. You keep track of all your orders in a table called Orders. Here is what the table looks like now:
Let’s use an INNER JOIN to grab some more meaningful data about the products:
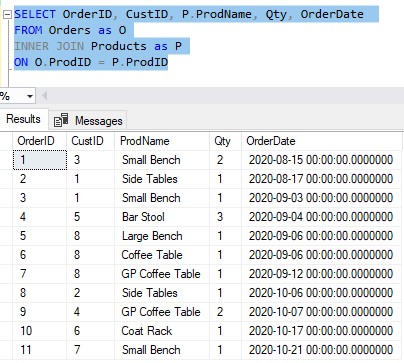
Ok, cool. So this query shows us basic details about each order that was placed for our business. We can see:
- The order number
- The ID of the customer who purchased the product
- What product they bought
- How many of said product they bought
- The date the order was made
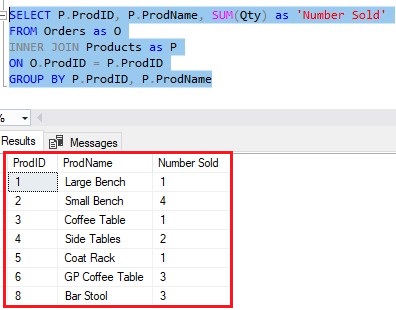
Great, so maybe we want to get a list of how many of each product has been sold overall. That can be accomplished through a simple GROUP BY query:
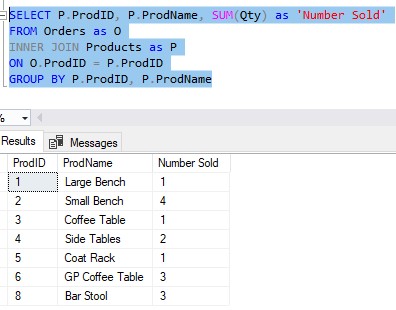
Ok, so now we see how many of each product has been sold overall.
Here is where we could use a cursor:
What if we wanted to write out our best-selling products to a separate table called ‘BestSellers‘? We say our “best-sellers” are products we have sold more than 3 of.
Basically that means we look at each row in our GROUP BY query and see what value a product has for the “Number Sold” column. If a product has a “Number Sold” greater than 3, we write it’s details to the BestSellers table. Otherwise, we leave it out of the table.
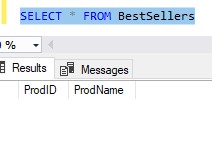
The BestSellers table is empty right now:
So we’ve established we basically want to iterate through each row in our GROUP BY query, from top to bottom, and decide if we need to do work on a row in that result set.
This is a great task for a cursor!
And I know, this seems like a waste of time for our small result set. It looks like just the “Small Bench” is our best seller. But in SQL Server, we need to think BIG. What if you work for Amazon, and want to get a best-seller list? With millions of products, it would take you forever.
So let’s think about how we would use a cursor to create our best-seller list:
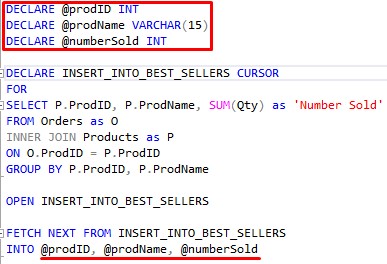
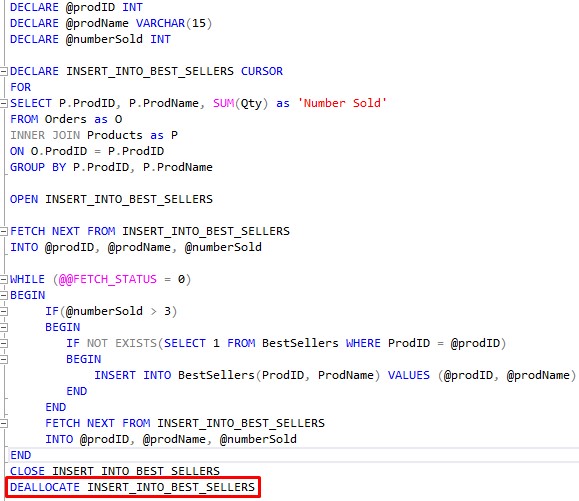
1. Declaring a cursor.
The first step to using any cursor in SQL Server is to declare the cursor. This step has two parts, and they are very easy.
First, we basically need to give this iteration process a name. Let’s say we want to name our process INSERT_INTO_BEST_SELLERS. The syntax for declaring our cursor with this name is the following:
DECLARE INSERT_INTO_BEST_SELLERS CURSOR
So you just use the DECLARE keyword, followed by the name of your cursor, followed by the CURSOR keyword.
Easy peasy
The second part to declaring a cursor is outlining the query whose result set you want to iterate through. In our example, the result set we want to iterate through is this one:
This is the query/result set the cursor will be used for. So, we include this query as part of the declaration, basically like this:
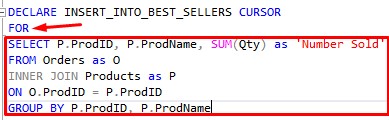
You just use the FOR keyword followed by the query whose results you want to iterate through.
(As a side note, the columns in your query don’t all need names. I named my aggregate column ‘Number Sold‘, but I could have left that alias out if I wanted to.)
Ok, that was easy, right?
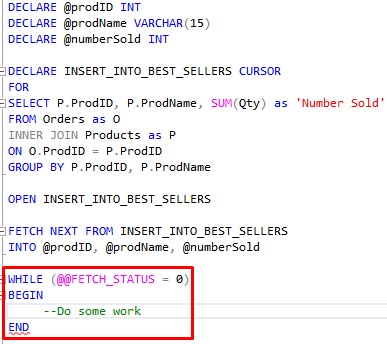
2. Opening a cursor.
This step is even easier. If we are officially ready to start using our cursor, we need to open it.
The syntax is simple:
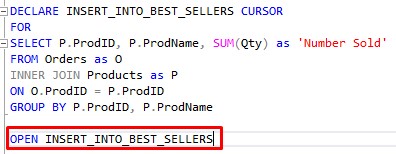
You use the OPEN keyword, followed by the name of your cursor. So easy.
3. “Fetching” data for a cursor.
Ok, we knew this wouldn’t stay simple forever, so let’s talk about where things get interesting.
Let’s think about the result set of our query. Here it is:

When the cursor iterates through this result set, it will look at each row one at a time and do work on that row’s data.
It starts at the top, looking at the very first row. In order to “do work on that row’s data” we need to write out that rows data into respective variables.
The first row has the following data:
ProdID = 1
ProdName = Large Bench
Number Sold = 1
We need to write these values to variables.
So to get the first row in the result set, and also write it’s values to variables, we use the following syntax:
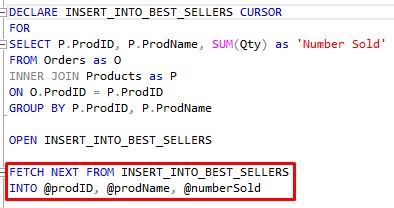
So this FETCH block basically gets the ball rolling. All it’s saying is to grab the next row in the result set (which, at the time, will just be the first row), and write it’s column values to variables we will use later.
Here is something you need to do also: You need to declare those variables.
A good place to declare those variables is outside of the cursor, like so:
So, just to reiterate, at this point in the process our variables contain data for the very first row, which would be:
@prodID = 1
@prodName = Large Bench
@numberSold = 1
We’ll use these variables in the looping process of our cursor (where we “do work”).
4. Looping through a cursor.
Ok, here’s the meat of this thang.
Let’s go back to what we want to accomplish with this cursor. We want to look at each row in our result set, and if the ‘Number Sold‘ value is greater than 3, we will write that product’s ID and Name to the BestSellers table.
The first step to looping through our result set it to outline the WHILE loop. Here is what it looks like at first:
We need to talk about @@FETCH_STATUS. All that is asking is if our most recent FETCH operation retrieved something.
At this point in our cursor, we did a fetch for the top row of the result set. So if the result set contains even a single row, the status will be: “Something was successfully fetched“.
If “something was successfully fetched“, the value returned from @@FETCHED_STATUS is zero.
I know, this seems bass ackwards. Normally a status of zero is false. But in the case of @@FETCH_STATUS, zero is what we want.
It’s just one of those things you got to remember.
The content of your WHILE loop
Now we need to think about the content of the WHILE loop. I’m not going to spend too much time talking about the content of this particular WHILE loop because yours will probably be different.
Just know this: The body of the WHILE loop is where you do your work, likely using some or all of the variables that are part of your cursor.
Here’s the body of our WHILE loop:
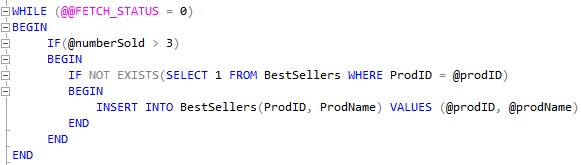
So basically, the first thing we do is check the @numberSold value for this particular result set row we’re on. If it’s greater than 3, we know it might need to get added to the BestSellers table.
Why “might” it? Because we don’t want to insert this product’s details if it’s already in the BestSellers table.
We use the @prodID variable to see if that product is already in the BestSellers table. We use our handy IF NOT EXISTS tool to see if something gets returned when we query the table, looking for that particular product ID.
(In situations where I want to know if any rows exist at all, I like to use “SELECT 1“. No need to pull column data if I don’t really care about the column data!)
So, if we know the @numberSold is greater than 3, and the product is not already in the BestSellers table, then we can finally do our INSERT, which will use the @prodID and @prodName variables.
Don’t forget to move the WHILE loop forward.
Now, there is something very important missing from the WHILE loop.
If you remember our WHILE loop tutorial, we talked about how you need to make sure you are moving the loop forward.
Remember, we need the cursor to get through all the rows returned by our cursor query. The way we keep the loop moving is by making sure we fetch the next row in the result set.
Like this:
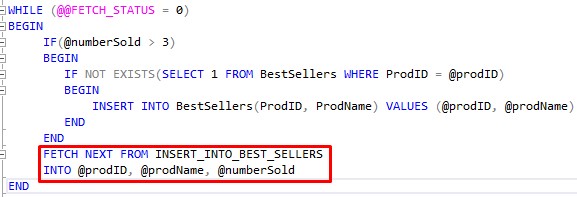
This loads up our variables with data from the next result set row from our cursor query.
Remember, the “cursor query” is basically the query identified by the cursor name, which is INSERT_INTO_BEST_SELLERS.
This beautiful symphony continues for all rows returned by our cursor query. As long as that FETCH statement keeps returning rows, we keep entering the WHILE loop and doing work.
Once we process the final result set row, what will be fetched?
Answer: Absolutely NOTHING.
So at that point, @@FETCH_STATUS will return something other than zero, which makes our condition false. This will exit the loop!
5. Closing and deallocating a cursor.
Unfortunately, when we exit the loop, the cursor does not close automatically. We need to manually close and deallocate the cursor.
Since we had to manually open the cursor, one shouldn’t be surprised we also need to manually close the cursor.
It’s simple:

The task of deallocating the cursor might not be so obvious.
Behind the scenes, SQL Server creates a data structure to hold the cursor and do it’s work. This data structure needs to get freed back to memory once we are done using the cursor.
You aren’t required to deallocate your cursor when you are finished with it, but you should. If you don’t manually deallocate your cursor, it will be deallocated naturally when it falls out of scope.
But honestly, you should get in the habit of deallocating objects when you are done with them. You shouldn’t rely on the automatic cleanup processes too much. You can get into trouble if you assume too much.
So do yourself a favor and just manually deallocate that which you created:
Here is a good link from Microsoft about the deallocation of cursors: DEALLOCATE (Transact-SQL)
Here is a great question on Stack Overflow about why it’s important to manually deallocate your cursors: What happens when you forget to close and deallocate cursor?
So now that our cursor is complete, we can do a quick run of it and see that it successfully inserts just the Small Bench product into our BestSellers table:
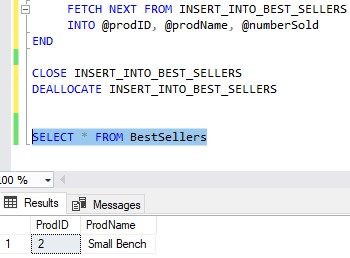
Nice!
Next Steps:
Leave a comment if you found this tutorial helpful!
You will most likely see and use cursors within stored procedures. If you need a quick rundown on what a stored procedure is and how they can help us, check out this link:
Stored Procedures: The Ultimate Guide for Beginners
Also, there is an extremely helpful book that introduces you to many T-SQL topics, including cursors, that you should get your hands on. It is called “T-SQL Fundamentals” by Itzik Ben-Gan. This is one of only a few books I own that helped me understand many SQL Server topics. You definitely won’t regret owning this book, trust me. Get it today!

Thank you very much for reading!
Make sure you subscribe to my newsletter to receive special offers and notifications anytime a new tutorial is released!
If you have any questions, please leave a comment. Or better yet, send me an email!