

The WHILE loop is one of the most basic tools you should know when you are first starting out with Microsoft SQL Server.
Sometimes when working with SQL Server, you need certain code to execute several times in a loop while some condition is true. As soon as that condition is false, you want the loop to stop executing.
The WHILE loop is the tool we can use to achieve that.
The WHILE loop is one of a few decision structures we have available to us in SQL Server. Another useful decision structure is the IF…ELSE IF….ELSE structure. This is another very common decision structure you will likely see and use as a database professional, so it’s important you understand how it works, too. If you missed the tutorial on that, you should check it out.
The IF…ELSE IF…ELSE Statement: Everything you should know.
In this tutorial, we’ll talk about just these 3 topics about the WHILE loop:
- What is the WHILE loop?
- An example of using the WHILE loop
- Tips, tricks, and links
Let’s get started.
1. What is the WHILE loop?
The WHILE loop is used to execute a block of code repeatedly while some condition is true. Each iteration of the loop should move towards making our condition false. As soon as that condition does evaluate to false, the loop terminates.
Here is the basic layout and syntax of the WHILE loop:
WHILE(<condition is true>)
BEGIN
<execute some code>
<move towards making condition false>
END
Each iteration of the loop should move the loop towards making the condition false. At the beginning of each iteration of the loop, it checks to see if our condition is, in fact, false.
There are a few things you should know about the syntax of the WHILE loop:
- The BEGIN…ELSE keywords need to be there if the body of your WHILE loop is more than one line long. If your body is only one line long, you can leave those keywords out. But honestly, I’m not sure how you could ever have a WHILE loop that is only one line long.
- The parentheses around the condition check of the WHILE loop are optional. I like to use parentheses because I think it makes the code a bit more readable.
Now that we know the syntax and the general idea, let’s take a look at some examples in the next section.
2. An example of using the WHILE loop
Let’s start with a very simple example to give you the idea.
Let’s say we want to simply print the numbers 1 through 12 to the screen. We can achieve that the hard way by doing this:
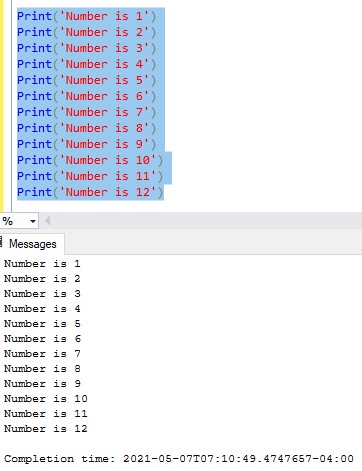
But again, that was the hard way. Instead, we can use a loop to do the same thing with less lines of code:
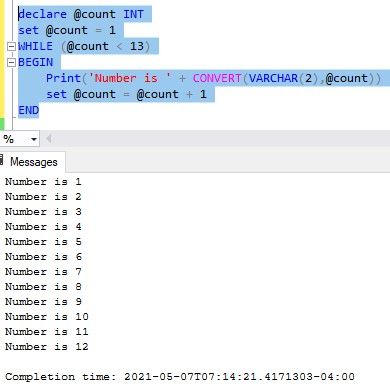
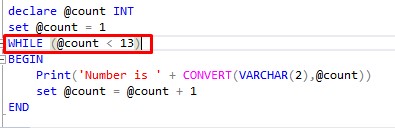
Let’s break down what’s happening in the loop. First, check out the @count variable we are using:
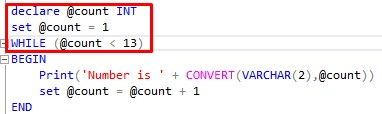
We’re using this @count variable to move our loop forward.
The condition we’re checking for is if @count is less than 13. In the first run of the loop, @count is simply 1 because that’s the value we set it to. Since 1 is less than 13, we enter the body of the loop:
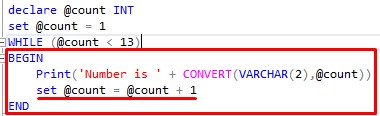
In the body of the loop, we do two things. We simply print the current value of @count, and then we increment our @count variable by 1.
Regarding the first part, notice we needed to use the CONVERT function to convert our @count integer to a character string data type. The Print system function wants everything to be in a character string format. We chose to use the VARCHAR character data type.
Check out the full tutorial on CONVERT: SQL Server CONVERT: A How-To Guide with Examples
The second thing to notice in the body of the loop is how we increment our @count variable by 1. This is very important.
The body of your while loop needs to move the loop forward, towards ending the loop.
When we increment @count, we are moving it closer and closer to the number 13, which will end the loop. Remember the condition we are checking for. We continue going through the loop while our @count variable is less than 13.
At the end of the 12th run of the loop, our @count variable will be incremented by 1 again, like normal. So it will be set to 13. Then we reach our condition check:
So is the number 13 less than 13?
Nope, so we bail. The loop ends.
What if we forgot to include that last line of the body, where we increment @count by 1? The @count variable would never change from it’s original value of 1, meaning our condition would always be true, FOREVER.
This, my friends, is what we call and infinite loop:
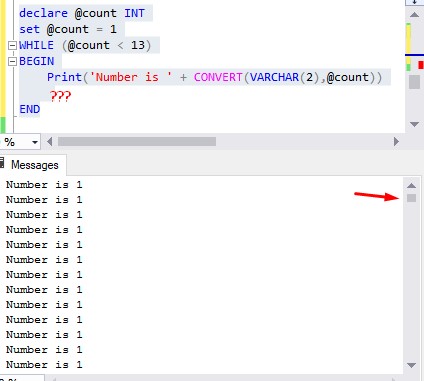
Notice two things:
- The @count value never changes
- See how tiny the scroll bar is in our result window? The string was printed probably hundreds of times.
(As a side note, I had to manually terminate the query to get it to stop. If I hadn’t, God only knows how long it would have ran.)
You can take the following statement to the bank: You will definitely write an infinite loop at some point in your career. It will obviously be an accident, but it will happen.
Trust me, I’m an infinite loop professional at this point.
A real-world example of a WHILE loop
Let’s think of a better real-world example of using a WHILE loop.
Say we own a retail store in the city of Boulder, Colorado. We have a table called BoulderStore to store basic customer information. Take a look at the content of that table:
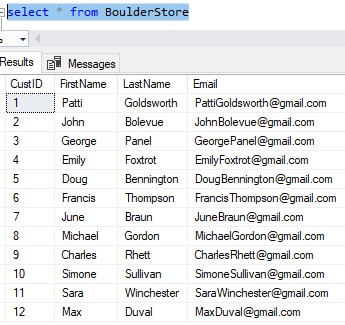
Cool. Notice the CustID values are 1 through 12.
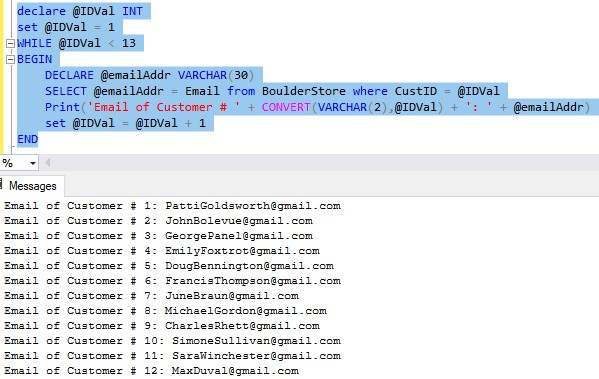
If we want to print each customer’s email address, we can achieve that easily using a WHILE loop:
Let’s break this down, too.
At the beginning of the loop, we outline the variable we will use to move the loop forward, and specify the condition for our loop:
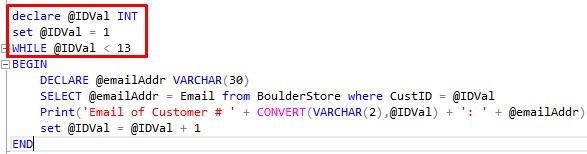
(Notice I didn’t use parentheses around my condition this time. Again, the use of parentheses is optional)
Then in the body of the loop, we create a simple @emailAddr variable. We populate that variable with the Email of the customer whose CustID matches the @IDVal we are currently on:
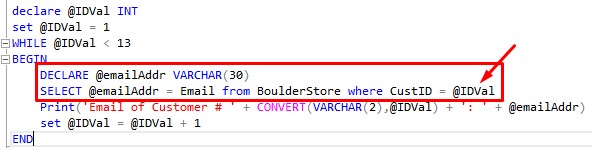
Then, we print the information we collected and increment our condition variable:

Don’t forget to change your condition variable! It needs to move towards the direction of ending the loop!
The use of WHILE loops in cursors
The examples in this tutorial are meant to get you familiar with WHILE loops and how they work. Similar examples may be used in the real world, but the most common use of a WHILE loop you’ll see in the real world is in Cursors.
There is enough information about the creation and use of SQL Server Cursors to justify it’s own tutorial. Make sure you check it out:
SQL Server Cursors: A How-To Guide
3. Tips, tricks, and links
Here’s a few tips and tricks you should know about the WHILE loop:
Tip # 1: You can have more than one condition in your WHILE loop
You can certainly have more than one check in the condition of your WHILE loop. You can separate your checks using either the AND or OR operators. But remember, you need to make sure the entire condition eventually evaluates to false, terminating the loop.
More information about the AND and OR operators can be found in the IF…ELSE IF…ELSE tutorial:
The IF…ELSE IF…ELSE Statement: Everything you should know.
Links
There is a great book called T-SQL Fundamentals written by Itzik Ben-Gan that goes over several core concepts you should know about SQL Server, including how to create WHILE loops. This is one of only a few books I own that helped me understand many SQL Server topics. You won’t regret owning this book, trust me. Definitely get it today!

Next Steps:
Leave a comment if you found this tutorial helpful!
Another great decision structure you should know is the CASE statement. Click the link to learn more!
Make sure you read the full tutorial on SQL Server Cursors. Cursors are where you will most likely see and use the WHILE loop, so you should make sure you understand how they work:
SQL Server Cursors: A How-To Guide.
Thank you very much for reading!
Make sure you subscribe to my newsletter to receive special offers and notifications anytime a new tutorial is released!
If you have any questions, please leave a comment. Or better yet, send me an email!