

As a database professional, you will be asked to come up with SELECT statements to pull needed information in a meaningful and accurate way.
Sometimes you will need to review other SELECT statements written by other people, too. Maybe those queries have a problem which is causing it to pull inaccurate information, or maybe the query is simply running inefficiently.
Knowing the most basic tools we use with the SELECT statement will definitely help you do these jobs better.
In my day-to-day job, I see the same several tools being used over and over again. Sometimes the queries are monstrously long, but they all still use just a handful of tools to gather all the required information.
Are you just starting out with SQL Server and not really sure what SELECT tools you should learn first?
In this tutorial, we will cover the top 6 tools you should know when writing SELECT statements. These are the top 6 tools I see and use frequently in my work as an application/database developer.
While there are certainly more than 6 tools out there, these are the most basic tools you should learn if you are just starting out with SQL Server. You will be able to write most queries with ease if you master these 6 tools.
The tools are:
- INNER and LEFT OUTER JOINS
- Views
- Set Operators
- The GROUP BY Clause
- Wildcards
- CAST and CONVERT
Without further ado, let’s take a look at each one:
1. INNER and LEFT OUTER JOINS
Dare I say, I see more queries with some kind of JOIN than queries without a JOIN.
JOINS are extremely common in the real world. If you want to write great SELECT statements, you need to learn about JOINS.
The INNER JOIN is the most common type of JOIN. We use an INNER JOIN in a SELECT statement to give us access to columns in two or more tables in order to present meaningful information to the user.
An INNER JOIN allows you to basically use a single SELECT statement to pull column information that would otherwise require you to write two or more SELECT statements.
If we get the same information using a single SELECT statement, instead of several, we will have written a better, cleaner solution.
An example of an INNER JOIN
Let’s say you are the owner of a small furniture store, and you manage your inventory and orders in a SQL Server database. You have an Orders table with the following information:
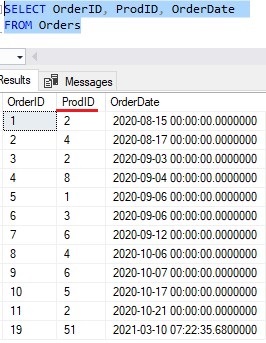
Notice the ProdID column. The values in this column map to a different table, which is the Products table. When looking at the Orders table, if we want to know more details about a Product (maybe what the product actually is or how much it sells for), we need to look at the Products table.
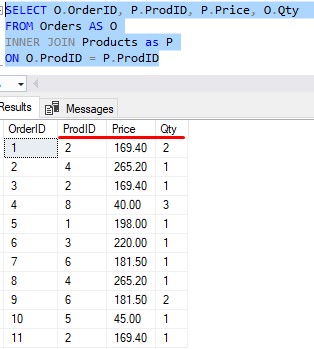
We could write a second query to get the rest of the product information, or we could write a JOIN. Here is what the JOIN looks like:
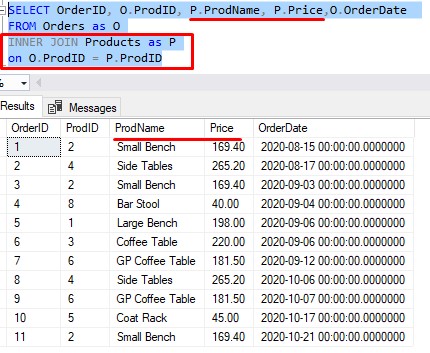
Very cool. We just link the two tables by the shared column, which is ProdID. The INNER JOIN basically returns row data if the value we are matching on exists in BOTH tables.
As I said, you need to master the INNER JOIN above all else. I have a full beginner-friendly tutorial on JOINS in general and also talks about the specifics on the INNER JOIN operator. Make sure to check it out:
SQL Server INNER JOIN operator: The Ultimate Guide for Beginners
An example of the LEFT OUTER JOIN
The LEFT OUTER JOIN (or just LEFT JOIN for short) is another handy tool to know when writing meaningful SELECT statements.
A LEFT JOIN will also give you access to columns in two or more tables. It will return column data for all rows in the first table of your JOIN (aka the ‘left‘ table) and only column data for matching rows in the second table (aka the ‘right‘ table).
Let’s think of an example. Maybe we still want to see the information we have for Products that have been ordered, but we also want to see details for Products that have never been ordered. In other words, we want to see details for all Products, regardless of if they have any order information associated with them.
We can achieve that through a simple LEFT JOIN, making the Products table the left table (the table we’re pulling everything from):
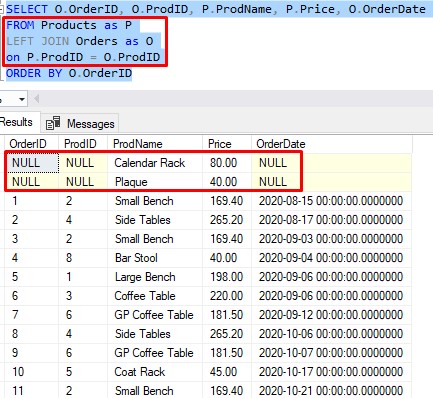
So, we see the “Calendar Rack” and the “Plaque” are two items that exist in the left table (Products) but don’t have any reference in the right table (Orders).
For all the Order columns in our query (OrderID, ProdID and OrderDate), there simply is no information to display, so SQL puts NULL for those columns, which denotes the absence of information.
Learn more about NULL here:
Are you making these 7 mistakes with NULL?
This is meant to be a quick introduction and overview of the LEFT JOIN. I have a full tutorial on the topic to answer any questions you might have. Definitely check it out:
SQL Server LEFT JOIN: The Ultimate Guide for Beginners
2. Views
SQL Server Views very common objects you will likely see in the real world. They can make the task of re-writing complicated queries extremely simple.
Basically, a View is a virtual table object that pulls column data from one or more tables. They can be used to store complex SQL queries so that they can be ran repeatedly using simple commands.
For example, take a look at this very complicated SELECT statement:
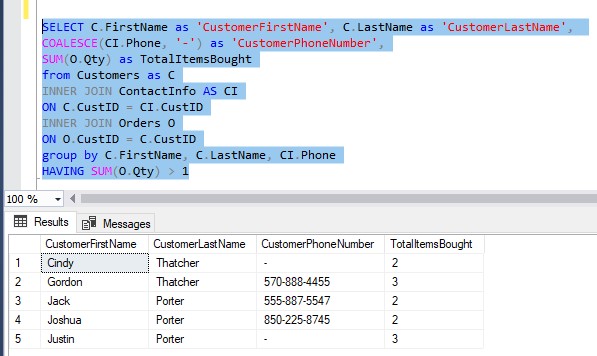
This query tells us which customers have bought from our store more than once (in other words, they are “repeat customers“). It gives us some basic information about those customers, such as their name and phone number.
How much of a pain in the a** would it be to try to remember this query if you needed to write it again? Wouldn’t it be easier to save this query as an object in the SQL Server?
Through the CREATE VIEW statement, we can do that:
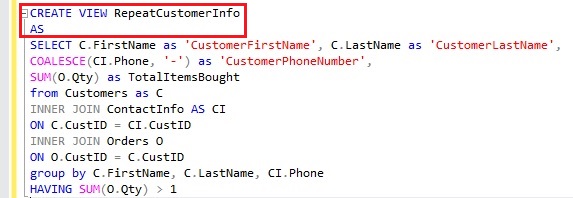
All you really need to do is say CREATE VIEW <viewName> AS followed by the complicated SELECT statement.
From there, that inner query will be saved as a virtual table object called a View. You would query the View just like you would query any other table. The result set of the View will be the same result set you would get if you just ran that inner query.
Here’s what it looks like:
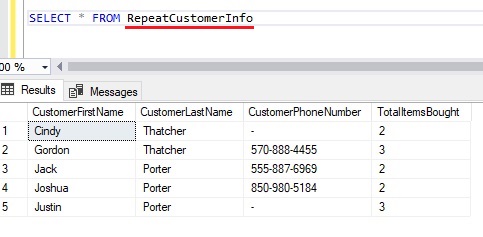
Notice we get the same result set, but with a much easier query!
Views are used everywhere, and for good reason, right? If you want to know more, take a look at the full tutorial:
What is a View in SQL Server? A Guide for Beginners
There are other table expressions you should know
Views are one of several different table expressions available to us in Microsoft SQL Server. There are other table expressions, such as Derived Tables which don’t create a persisting object in the database, for example. Sometimes you specifically don’t want to persist an object in the database like you get with a View.
To learn more about other table expressions, you should download a FREE copy of the SQL Server Table Expressions Ebook!

3. Set Operators
There is a tool to simply butt up the results of two or more queries together into a single result set. This is another extremely common task you will likely do in your career as a database professional.
To combine the results of two or more queries into a single result set, we use Set Operators.
The most common set operators are UNION, INTERSECT, and EXCEPT. Let’s talk about each.
The UNION set operator
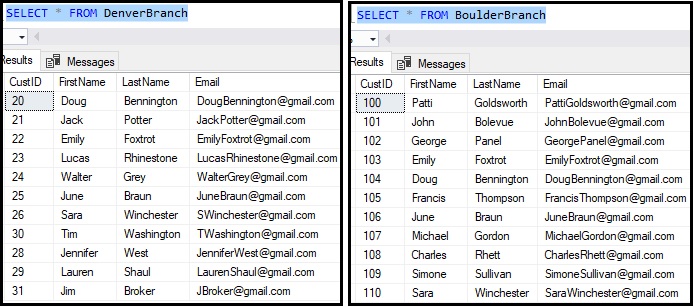
Let’s say you are the owner of a small chain of retail stores, with locations in Denver and the neighboring city of Boulder. You track information for customers in both store locations. Here is the list of customers:
So obviously, we’re looking at two different SELECT statements with two different result sets. But with UNION, we can combine the two result sets into a single result set. The syntax is very easy:
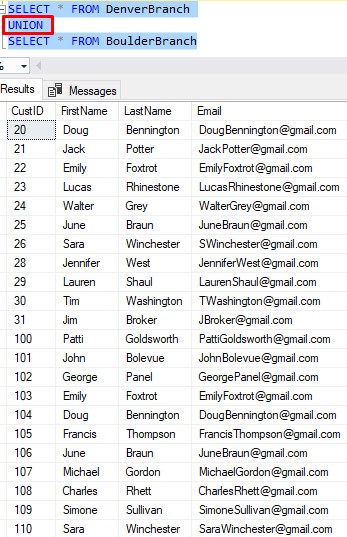
How easy was that?
Take a look at the full tutorial for more information, including what the UNION ALL operator does:
The UNION Set Operator: Everything you need to know
The INTERSECT set operator
What if you still want to combine the result sets, but want to do a bit of filtering. Maybe you want to specifically see only the customers who shop at both locations. Those customers would intersect both result sets.
We can use the INTERSECT set operator to see just that:
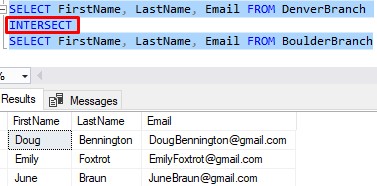
Looks like we should treat Doug, Emily, and June like royalty when they come in!
Take a look at the full tutorial for more information about the INTERSECT set operator:
The INTERSECT Set Operator: Everything you need to know
The EXCEPT set operator
What if we want to see people who exclusively shop at the Denver store? If they also shop at the Boulder store, we don’t want to see them. Maybe we want to extend a special offer to just our Denver customers.
(I guess this is sort-of the opposite of the INTERSECT operator)
Using the EXCEPT operator, we can see that information:
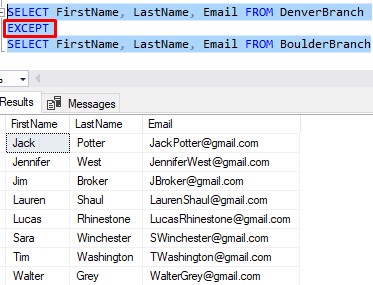
Notice Doug, Emily, and June are not in this result set. Since they shop at both locations (and, therefore, are not exclusive to our Denver store), they get excluded from the final result set.
Take a look at the full tutorial on the EXCEPT operator for more information:
The EXCEPT Set Operator: Everything You Need to Know
Rules you need to remember about Set Operators
While the syntax for set operators is certainly easy, there are several rules you need to remember about the individual queries used in your overall set operator query. Here is a quick overview of the rules:
- The two (or more) SELECT statements must have the same number of columns.
- The data types of each column in each SELECT statement must be compatible.
- In the final result set, the name of your columns is pulled from the name of the columns in your first query.
- The only ORDER BY clause allowed in the set operator query is a presentation ORDER BY clause after the last query.
Also, don’t forget about Set Operator Precedence. If you write a query using more than one kind of set operator, you need to understand which set operators will take precedence and run first. Your set operator queries might not turn out like you expected if you don’t know about set operator precedence!
For a discussion about each of these rules, take a look at the full introductory tutorial on set operators:
SQL Server Set Operators: The Ultimate Guide
4. The GROUP BY clause
A very common need you will encounter is to summarize (or aggregate) data in a query. Normally, you will be summarizing data by different groups.
For example, maybe you need to count the number of Employees you have in each country. The “aggregate” is the count of employees, and the “groups” would be the different countries.
Or maybe you need to add up how much income each product has made your business. The “aggregate” is the total income, and the “groups” would be the different products.
The GROUP BY clause is what we use to do exactly that. Next to the different JOIN operators, I’d say this is another extremely common tool you will see and use in the real world.
Let’s see what the queries would look like for each of our examples mentioned above:
Using COUNT(*) with the GROUP BY clause
Here is the list of Employees we have in our business:
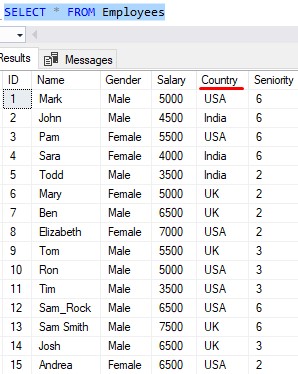
With only 15 employees, it would be easy to just look at this list and figure out how many employees we have in each country. But when working with SQL Server, we need to THINK BIG.
The query to count the number of employees in each city would look like this:
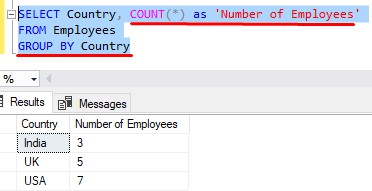
Perfect, that gives us exactly what we wanted!
Using SUM() with the GROUP BY clause
Let’s take a look at the list of orders our business has fulfilled, using an INNER JOIN to see some information about each Product (see how useful INNER JOINS are?):
In this query, we see some basic information about an order:
- OrderID for the order
- What Product was purchased
- How much that Product sells for
- How many of said product the customer bought
So again, we want to know how much money we have made from each product. Since we have a list of orders, and we know how much each product sells for, we can get that breakdown fairly easily:
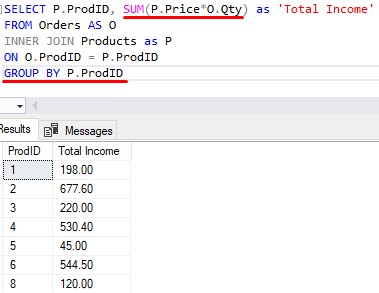
Very cool. Again, the “groups” are the different products, and the “aggregate” is the summation of income earned for each of those products.
As usual, there is a full tutorial on the GROUP BY clause as well. Make sure you check it out:
The GROUP BY clause: A How-To Guide
While you’re at it, you might as well learn about the HAVING clause, which is basically an extension of the GROUP BY clause. We would use the HAVING clause if we wanted to filter the results of an aggregation. For example, if we wanted to filter the query above to only show products that have earned us over $500.00, we could use the HAVING clause to achieve that.
Check it out:
The HAVING Clause: How it works
5. Wildcards
No query is complete without a good WHERE clause. I’d guess that you will rarely write a SELECT statement without a WHERE clause.
Most comparison operators you use in a WHERE clause are very simple. Things like ‘=‘, ‘<‘, ‘>‘, BETWEEN, the IN clause, etc.
But a good understanding of wildcards is what separates the men from the boys.
(or the women from the girls, if you’re the fairer gender)
There are several wildcards out there, including:
- Percent (%) wildcard
- Underscore (_) wildcard
- [List of characters] wildcard
- [Range of characters] wildcard
Each wildcard will be used with the “LIKE” keyword.
Examples of using wildcard characters
Let’s say you are the manager of the Denver branch store location. You just had a conversation with a great customer named Sara….
Or maybe it was Kara?
She said she signed up to receive newsletters and special offers from your store (which means she ought to be in our DenverBranch table). You told her you would send her a special 10% off coupon for being such a great customer.
BUT YOU DON’T REMEMBER IF IT WAS “SARA” or “KARA”!
She said her last name, too. You think it maybe started with a ‘W‘.
If you know how to effectively use wildcards, this is all the information you need to find her in the database.
The query could look like this:
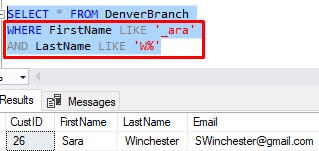
We used the underscore wildcard to find any first names that start with any single character and ends with ‘ara‘.
We used the percent wildcard to find any last names that start with ‘W‘ and ends with any number of characters.
The query returned only one person, Sara Winchester. Thats gotta be her. You did it!
Take a look at the full tutorial to learn all about the other wildcards you will likely see in the real world:
All about wildcards: The 5 wildcards you need to know
6. CAST and CONVERT
When querying different tables and columns, sometimes it is necessary to convert a column or expression from one data type to another on the fly.
Of course, before knowing how CAST and CONVERT work, you should know a thing or two about data types.
There are two tools we can use to convert to other data types on the fly. Which one you use depends on your needs at the time.
The CAST conversion function
Let’s say you want to figure out the average price of all the products in our inventory.
Here is the data in our Products table:
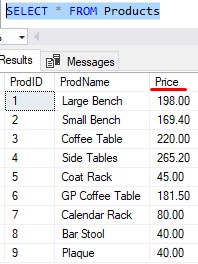
It’s a fairly simple query to get the average price of all those items:
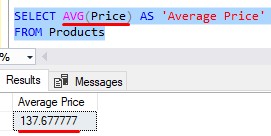
Nice.
But take a look at the resulting value, 137.6777777. Maybe we don’t want to present so many decimal places. Maybe we should round this number to the nearest whole cent (in other words, we want to see only two decimal places).
Using the CAST conversion function, we can do that. We can force the result to display as a decimal data type with only 2 places after the decimal:
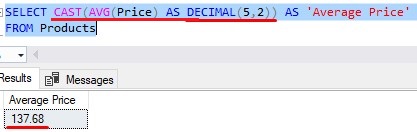
Superb!
The CONVERT conversion function
CONVERT is very similar to CAST, but it has an added benefit that you will likely find yourself needing at some point.
With the CONVERT function, you can link a certain style with your target data type. The easiest way to show you what I mean is to look at an example.
Say we want to convert the following character string into a DATETIME data type:
‘9/3/2021’
This string appears to be the character-string-representation of the date September 3rd 2021.
If we want to convert this to be an actual DATETIME value, and not a character string, the conversion would probably succeed without issue.
The string appears to be in the correct format you would expect a date to be in, and there are no extra characters to throw off the conversion process.
But let’s think about something. Is that date, in fact, September 3rd, or it is maybe March 9th?
In Britain and France, they write their dates differently than those of us in the United States. They write the day first, followed by the month, followed by the year.
Things aren’t so simple now, are they?
If you want to convert the string ‘9/3/2021’ to a DATETIME data type and make sure it’s a United States “style”, you can use the CONVERT function with a style code of 101.
Here’s an example, using the handy DATENAME function to prove the new date is in fact September 3rd:
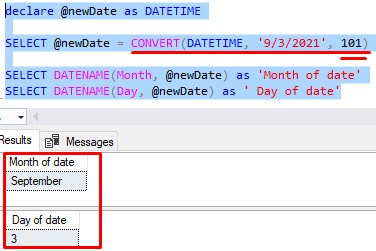
The style is just a numeric code. In our example, we need to use a style of 101 to represent U.S. format for our date. For the full list of styles, check out the official Microsoft documentation: Cast and Convert (Transact SQL)
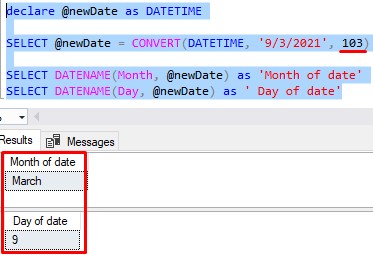
But if we wanted to specifically save this as a British DATETIME variable, we would just change the style in the same query. The style code for British dates is 103:
Here is a link to the full tutorial about the CAST and CONVERT functions:
CAST and CONVERT: A How-To Guide
Next Steps:
Leave a comment if you found this tutorial helpful!
Everything discussed in this tutorial can be found in the Quintessential Queries Ebook!
This Ebook is a complete guide on beginner to advanced querying tools in Microsoft SQL Server. It will definitely be a great resource for you to keep and reference throughout your career as a database professional. Download it today!
Definitely check out all the links to the full tutorials on each of the 6 tools you need to know. Here they are together for your convenience:
- SQL Server INNER JOIN operator: The Ultimate Guide for Beginners
- SQL Server LEFT JOIN: The Ultimate Guide for Beginners
- What is a View in SQL Server? A Guide for Beginners
- SQL Server Set Operators: The Ultimate Guide
- The GROUP BY clause: A How-To Guide
- All about wildcards: The 5 wildcards you need to know
- CAST and CONVERT: A How-To Guide
Thank you very much for reading!
Make sure you subscribe to my newsletter to receive special offers and notifications anytime a new tutorial is released!
If you have any questions, please leave a comment. Or better yet, send me an email!