

One of the more tricky things I learned early in my career was how to do an UPDATE statement with a JOIN. This is a very interesting task to think about. There may be situations when we want to perform an UPDATE to the results of a JOIN query, such as an INNER JOIN or a LEFT JOIN.
SQL Server allows us to do it, and it’s honestly not too difficult.
Do you need to learn how to do an UPDATE statement with a JOIN? In this tutorial, we’ll learn how it’s done!
There are only a few steps to successfully run an UPDATE statement with a JOIN. We’ll talk about these topics:
- An example of when you might want to perform an UPDATE statement with a JOIN
- Writing your UPDATE statement as a SELECT statement first
- The general syntax of writing an UPDATE statement with a JOIN
- Converting your SELECT statement to an UPDATE statement.
- Tips and tricks
Also, everything in this tutorial can also be found in the following FREE Ebook:
FREE Ebook on SQL Server JOIN Operations!
This guide contains all the key points you need to understand about the different JOIN operations in Microsoft SQL Server. It will definitely be a great resource to keep and reference throughout your career as a data professional. Download it today!
Let’s start from the top:
1. An example of when you might want to perform an UPDATE statement with a JOIN
We need to get some data set up. Let’s take the example of a business owner who uses SQL tables to keep track of their Customers, Products, and Orders.
We’ll create a simple table for each entity. Here’s the Customers table, with some data to go in it:
CREATE TABLE Customers
(
CustID INT PRIMARY KEY IDENTITY,
FirstName VARCHAR(15) NOT NULL,
LastName VARCHAR(15) NOT NULL
)

INSERT INTO Customers (FirstName, LastName)
VALUES
('Joshua', 'Porter'),
('Andrew', 'Bluefield'),
('Jack','Porter')
Then we’ll create the Products table. Let’s say we are in the business of woodworking:
CREATE TABLE Products
(
ProdID INT PRIMARY KEY IDENTITY,
ProdName VARCHAR(15) NOT NULL,
Price DECIMAL(5,2) NOT NULL
)

INSERT INTO Products (ProdName, Price)
VALUES
('Large Bench', 198.00),
('Small Bench',169.40),
('Coffee Table', 220.00),
('Side Tables',265.20)
Finally, let’s add an Orders table. Of course, each row in the Orders table outlines the ID of the Customer who made the order, as well as the ID of the Product they bought:
CREATE TABLE OrdersBig
(
OrderID INT PRIMARY KEY IDENTITY,
CustID INT NOT NULL,
ProdID INT NOT NULL,
Qty TINYINT,
OrderDate DATETIME2(7)
)

INSERT INTO Orders (CustID, ProdID, Qty, OrderDate)
VALUES
(3, 4, 1, '8/1/2021'),
(2, 1, 1, '8/3/2021'),
(3, 2, 2, '8/5/2021'),
(2, 4, 1, '8/7/2021')
Cool, now let’s think about a scenario that might happen if you are a business owner. Let’s say one of your employee’s just got off the phone with a customer and tells you about the conversation:
“I just got a call from Mr. Bluefield who says he placed an order yesterday, August 3rd, for a Large Bench. He says he actually meant to purchase the Coffee Table, and not the bench. Do you think you can change the order in the database?”
No problem. Believe it or not, that sentence provides everything we need to know to successfully write our UPDATE statement.
2. Writing your UPDATE statement as a SELECT statement first
The first step to writing an UPDATE statement with a JOIN is to start simple. Before we even figure out how it’s done, let’s first find the row(s) we want to change by simply returning those rows in a SELECT statement with a JOIN.
Later, once we have isolated the rows we want to update, we can slightly modify the query so that it performs an UPDATE instead of a SELECT.
When it comes to learning new things in SQL, sometimes it’s easier to start with what we know.
Ok, so let’s look at the content of our Orders table presently:
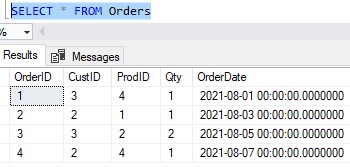
This isn’t very helpful, is it? We don’t know what these numbers mean, really. But we do know the CustID’s are a link to the Customers table, and the ProdID’s are a link to the Products table.
Knowing that, we can write a fairly simple query using two JOINs to give us more meaningful information about the data we’re looking at. This query will do:
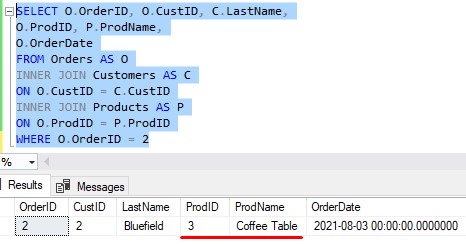
SELECT O.OrderID, O.CustID, C.LastName,
O.ProdID, P.ProdName,
O.OrderDate
FROM Orders AS O
INNER JOIN Customers AS C
ON O.CustID = C.CustID
INNER JOIN Products AS P
ON O.ProdID = P.ProdID
Here are the results:
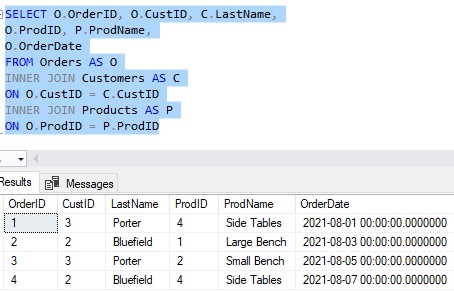
Nice. Do you see the order our employee told us about? Our employee said “Mr. Bluefield placed an order yesterday, August 3rd, for a Large Bench“.
Looks like it’s Order # 2. Let’s go ahead and filter this query to only show data for Order # 2:
SELECT O.OrderID, O.CustID, C.LastName,
O.ProdID, P.ProdName,
O.OrderDate
FROM Orders AS O
INNER JOIN Customers AS C
ON O.CustID = C.CustID
INNER JOIN Products AS P
ON O.ProdID = P.ProdID
WHERE O.OrderID = 2
You should see just the one row:

Awesome, that’s the row we want to update. So again, what we’re going to do next is change this SELECT statement to an UPDATE statement (with a couple more tweaks to it).
3. The general syntax of writing an UPDATE statement with a JOIN
Before we go over the syntax of an UPDATE statement with a JOIN, let’s go over what the syntax for a SELECT statement with a JOIN looks like (again, we’re starting with what we know).
As we know, the syntax for a SELECT with JOIN is basically this:
SELECT <column list>
FROM Table1 AS Alias1
LEFT/INNER JOIN Table2 AS Alias2
ON Alias1.Column = Alias2.Column
Ok, good. Well here is what the syntax for an UPDATE statement with a JOIN looks like:
UPDATE <table alias for the table we need to update>
SET <column name> = <new column value>
FROM Table1 AS Alias1
LEFT/INNER JOIN Table2 AS Alias2
ON Alias1.Column = Alias2.Column
Folks, here’s what you need to know about this syntax: Everything from the FROM clause down is the same as the SELECT statement. I’m talking about this part:
FROM Table1 AS Alias1
LEFT/INNER JOIN Table2 AS Alias2
ON Alias1.Column = Alias2.Column
Notice it’s exactly the same whether you’re doing a SELECT with a JOIN or an UPDATE with a JOIN.
My friends, this is why we write our query as a SELECT statement first. If we can first pull the rows we want to update using a SELECT statement, we can very easily convert that statement to an UPDATE.
Let’s actually do it in the next section…
4. Converting your SELECT statement to an UPDATE statement.
Ok, so let’s revisit our SELECT statement, which isolated the row we want to update:
SELECT O.OrderID, O.CustID, C.LastName,
O.ProdID, P.ProdName,
O.OrderDate
FROM Orders AS O
INNER JOIN Customers AS C
ON O.CustID = C.CustID
INNER JOIN Products AS P
ON O.ProdID = P.ProdID
WHERE O.OrderID = 2
As I said, everything from the FROM clause down will be exactly the same for our UPDATE statement with a JOIN.
Why don’t we start with that:
FROM Orders AS O
INNER JOIN Customers AS C
ON O.CustID = C.CustID
INNER JOIN Products AS P
ON O.ProdID = P.ProdID
WHERE O.OrderID = 2
Ok, so we know we need to just add two parts to the beginning of this statement:
UPDATE <table alias for the table we need to update>SET <column name> = <new column value>
Let’s go over each:
UPDATE <table alias>
In this UPDATE statement, we very simply need to provide the alias for the table we want updated.
In our case, the “table we want updated” is the Orders table.
Remember what our employee said. The order for Mr. Bluefield needs to be changed to reference the Coffee Table product.
In our Products table, we can see the ID of the coffee table is 3.
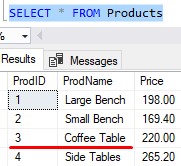
So basically, for Mr. Bluefield’s order, we need to change the ProdID value from 1 to 3.
But again, the point is we very simply need to outline the alias for the table we intend to update. The alias of the Orders table appears to be simply the letter ‘O‘. So let’s plug that into our statement:
UPDATE O
SET <column name> = <column value>
FROM Orders AS O
INNER JOIN Customers AS C
ON O.CustID = C.CustID
INNER JOIN Products AS P
ON O.ProdID = P.ProdID
WHERE O.OrderID = 2
That was easy.
The SET clause
Folks, the SET clause in this UPDATE statement isn’t going to be much different from the SET clause in a regular UPDATE statement. You simply outline the column you want to update and the value you want it updated to.
So, as I said, we want the ProdID value updated to the number 3. That’s an easy SET clause:
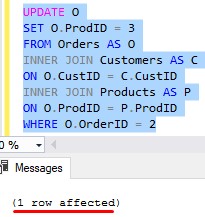
UPDATE O
SET O.ProdID = 3
FROM Orders AS O
INNER JOIN Customers AS C
ON O.CustID = C.CustID
INNER JOIN Products AS P
ON O.ProdID = P.ProdID
WHERE O.OrderID = 2
I like to specify the table alias in my SET clause when I’m doing an UPDATE statement with a JOIN. Understand that you don’t need to do this, though.
I could have just written SET ProdID = 3 and it would still work fine. The reason it works is because the SET clause knows what table you want updated because of the alias you specified in the UPDATE part.
Awesome, so if we run this statement, we see it executes successfully:
Cool, so now if we run our SELECT statement again, we see things look correct now for Mr. Bluefield’s order:
Superb!
Folks, it’s actually very easy to perform an UPDATE statement with a JOIN. I hope you see that now.
5. Tips and tricks
Here are some things to remember about performing an UPDATE statement with a JOIN:
Tip # 1: You can specify the table name in the UPDATE part instead of a table alias
We don’t need to create table aliases if we don’t want to. If we don’t use aliases, we would need to outline the entire table name instead.
For example, we could have done this instead:
UPDATE Orders
SET ProdID = 3
FROM Orders
INNER JOIN Customers
ON Orders.CustID = Customers.CustID
INNER JOIN Products
ON Orders.ProdID = Products.ProdID
WHERE Orders.OrderID = 2
Does that seem like more work?
Yeah, I agree.
Tip # 2: You cannot update more than one table at a time
Even though you’re performing a JOIN, you are still only allowed to update one table at a time. You can’t update data in the Orders table and simultaneously update data in the Customers table all in one UPDATE statement, for example.
Tip # 3: Start with what you know
I need to say it again. The key to performing this kind of UPDATE is to start with pulling the rows you want in a SELECT statement. Once you have the SELECT statement, it is very easy to convert it to an UPDATE.
Next Steps:
Leave a comment if you found this tutorial helpful!
Also, check out this FREE Ebook:
FREE Ebook on SQL Server JOIN Operations!
This guide contains all the key points you need to understand about the different JOIN operations in Microsoft SQL Server. It will definitely be a great resource to keep and reference throughout your career as a data professional. Download it today!
Odds are, if you are researching how to perform an UPDATE statement with a JOIN, you probably already know how a JOIN works in the first place. But if not, or if you need a refresher, take a look at the full tutorial here:
INNER JOIN in SQL Server: The Ultimate Guide for Beginners
Thank you very much for reading!
Make sure you subscribe to my newsletter to receive special offers and notifications anytime a new tutorial is released!
If you have any questions, or if you are struggling with a different topic related to SQL Server, I’d be happy to discuss it. Leave a comment or visit my contact page and send me an email!