It is very easy to write a DELETE statement with a JOIN.
In this very brief tutorial, we’ll walk through how it’s done. We’ll go over just these two topics:
- Write it as a SELECT statement first
- Convert your query to a DELETE statement
Everything in this tutorial can also be found in the following FREE Ebook:
FREE Ebook on SQL Server JOIN Operations!

This guide contains all the key points you need to understand about the different JOIN operations in Microsoft SQL Server. It will definitely be a great resource to keep and reference throughout your career as a data professional. Download it today!
Let’s start from the top:
1. Write it as a SELECT statement first
The best way to write a DELETE statement with a JOIN is to simply write a SELECT statement first to isolate exactly the rows that you want to delete.
Once we’ve gathered those rows, we can easily convert the query into a DELETE statement.
Let’s start with creating a bit of data to work with. We’ll create a Books table and a BookSales table:
CREATE TABLE Books
(
BookID INT IDENTITY(1,1),
Title VARCHAR(50),
Author VARCHAR(20),
Price DECIMAL(5, 2)
)

INSERT INTO Books (Title, Author, Price)
VALUES ('As a man thinketh', 'Allen', 14.95),
('Eat that frog!', 'Tracy', 12.45),
('T-SQL Fundamentals', 'Ghan', 109.45),
('American Fire', 'Hesse', 24.00),
('Atomic Habits', 'Clear', 11.98),
('Pro SQL Server Internals', 'Korotkevitch', 65.99),
('Deep Work', 'Newport', 14.99)

CREATE TABLE BookSales
(
SaleID INT IDENTITY(100,1) NOT NULL,
CustID INT,
BookID INT,
OrderDate DATE
)

INSERT INTO BookSales(CustID, BookID ,OrderDate)
VALUES (5, 4, '2021-04-01'),
(5, 3, '2021-04-06'),
(10, 2, '2021-04-23'),
(20, 6, '2021-04-30'),
(20, 4, '2021-05-06'),
(15, 5, '2021-05-15'),
(10, 3, '2021-05-17')
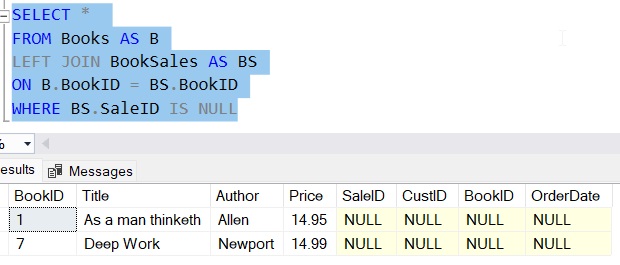
Let’s say we were interested to know what books are in our inventory that actually haven’t had a sale. A query to extract that information would look like this:
SELECT *
FROM Books AS B
LEFT JOIN BookSales AS BS
ON B.BookID = BS.BookID
WHERE BS.SaleID IS NULL
The query uses the handy IS NULL predicate to isolate those rows that exist in the left table that specifically don’t exist in the right table. In other words, we’ll pull books that specifically aren’t referenced in the BookSales table.
Here is what the result set would look like:

These two books have never been sold! Maybe we want to just delete these books from our inventory since, clearly, nobody wants to buy them!
2. Convert your query to a DELETE statement
Folks, most of the work has already been done. All we need to do is convert our SELECT statement to a DELETE statement. There are only three steps to accomplishing that:
Step # 1: Blow away the SELECT keyword and the column list:
Your modified query will just look like this:
.....
FROM Books AS B
LEFT JOIN BookSales AS BS
ON B.BookID = BS.BookID
WHERE BS.SaleID IS NULL
Step # 2: Start off the statement with the “DELETE FROM” keyword (which is how any DELETE statement starts)
Like this:
DELETE FROM ....
FROM Books AS B
LEFT JOIN BookSales AS BS
ON B.BookID = BS.BookID
WHERE BS.SaleID IS NULL
And in fact, if you wanted to, you could omit the word “FROM” and just say “DELETE” to do less typing.
Step # 3: Next to the DELETE FROM keyword, outline the alias of the table from which you want data deleted
In our case, we want to delete content from the Books table, which is aliased by the letter “B“. So that’s the alias we outline next to the DELETE FROM keyword:
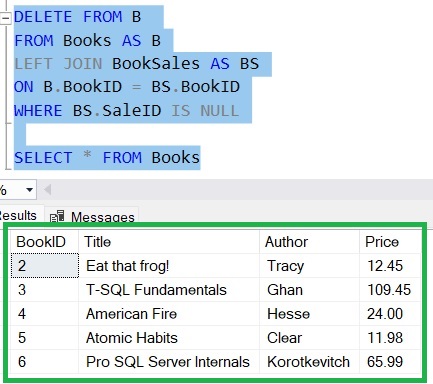
DELETE FROM B
FROM Books AS B
LEFT JOIN BookSales AS BS
ON B.BookID = BS.BookID
WHERE BS.SaleID IS NULL
Folks, that’s it!
If we run this statement, then check the content in our Books table, we see the sales-less books are deleted!:

So simple.
Next Steps:
Leave a comment if you found this tutorial helpful!
You can also write an UPDATE statement with a JOIN. The process is very similar to what you’ve just learned. Take a look at the full tutorial:
UPDATE statement with JOIN: How it’s done
Also, make sure you download your FREE Ebook:
FREE Ebook on SQL Server JOIN Operations!

This guide contains all the key points you need to understand about the different JOIN operations in Microsoft SQL Server. It will definitely be a great resource to keep and reference throughout your career as a data professional. Download it today!
Odds are, if you are researching how to perform a DELETE statement with a JOIN, you probably already know how a JOIN works in the first place. But if not, or if you need a refresher, take a look at the full tutorial here:
INNER JOIN in SQL Server: The Ultimate Guide for Beginners
Thank you very much for reading!
Make sure you subscribe to my newsletter to receive special offers and notifications anytime a new tutorial is released!
If you have any questions, or if you are struggling with a different topic related to SQL Server, I’d be happy to discuss it. Leave a comment or visit my contact page and send me an email!


