

SQL Server Triggers are some of the most helpful objects available to us in Microsoft SQL Server.
A proper understanding of triggers is essential if you are looking to enter the field of database design and development. In this tutorial, we’ll discuss everything you need to know about triggers in SQL Server.
We’ll discuss these topics:
- What is a SQL Server trigger?
- The AFTER/FOR SQL Server trigger
- The INSTEAD OF SQL Server trigger
- The ‘inserted‘ and ‘deleted‘ tables
- Examples of SQL Server triggers
- Tips, Tricks, and Links
Make sure you download the following FREE Guide:
FREE 1-Page Simple SQL Cheat Sheet on SQL Server DML Triggers!
This guide contains all the key point you need to understand about DML triggers in SQL Server, condensed into a simple 1-page guide. It will be a great resource for you to reference during your career as a database professional. You won’t regret owning this guide. Get it today!
Let’s start from the top:
1. What is a SQL Server trigger?
A trigger allows us to introduce custom code to execute either after or in place of data modification statements against a table or a View.
Triggers are a great tool we can use to introduce custom data validation or custom work to run when data is modified within our tables. That “work” can be anything under the sun. For example, we’ll see how you can use a trigger to enforce certain business rules in our databases that otherwise couldn’t be enforced through something like a constraint, for example.
This tutorial discusses DML (Data Manipulation Language) triggers. These are triggers you would create when you want to fire code for either an INSERT, UPDATE, or DELETE statement that is ran against a table.
The syntax for a trigger is very simple. It basically follows this layout:
CREATE TRIGGER <trigger-name>
ON <table-name>
<trigger-type> INSERT/UPDATE/DELETE
AS
<trigger-body>
Let’s talk about each part of this syntax:
<trigger-name>
You can name your trigger anything you want!
<table-name>
The name of the table for which you want to establish a trigger. We’ll see that some triggers can actually be created for a View. In that case, you would put the name of the View here.
<trigger-type>
For DML triggers, we can specify a trigger type of AFTER/FOR or INSTEAD OF. We’ll discuss each type in the next sections.
INSERT/UPDATE/DELETE
Here is where you outline which DML statement you want the trigger to fire for. For example, if you want the trigger to fire after any UPDATE statement is performed against the table, you would just outline the keyword “UPDATE” here. Your trigger can fire for multiple DML statements, too. You could outline 2 or all 3 DML statements here if you wanted to. For example, if you want your trigger to fire anytime any INSERT, UPDATE, or DELETE is ran against the table, you would just outline “INSERT, UPDATE, DELETE” here.
<trigger-body>
This is the main body of the trigger where we run custom work that executes when the trigger fires. As I said earlier, this can be anything under the sun. We’ll take a look at some examples of what you can do in a trigger.
Setting up some data
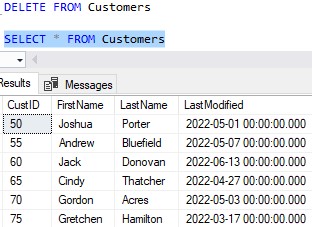
We need to set up some quick data to work through the examples in this tutorial. We’ll create a very simple Customers table:
CREATE TABLE Customers(
CustID int IDENTITY(50,5) NOT NULL,
FirstName varchar(20) NULL,
LastName varchar(20) NULL,
LastModified DATETIME NOT NULL
)

INSERT Customers (FirstName, LastName, LastModified)
VALUES
('Joshua', 'Porter', '2022-05-01'),
('Andrew', 'Bluefield', '2022-05-07'),
('Jack', 'Donovan', '2022-06-13'),
('Cindy', 'Thatcher', '2022-04-27'),
('Gordon', 'Acres', '2022-05-03'),
('Gretchen', 'Hamilton', '2022-03-17')
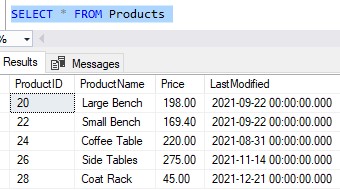
And a Products table:
CREATE TABLE Products(
ProductID int IDENTITY(20,2) NOT NULL,
ProductName varchar(20) NULL,
Price decimal(5, 2) NULL,
LastModified DATETIME NOT NULL
)

INSERT Products (ProductName, Price, LastModified)
VALUES
('Large Bench', 198.00, '2021-09-22'),
('Small Bench', 169.40, '2021-09-22'),
('Coffee Table', 220.00, '2021-08-31'),
('Side Tables', 265.20, '2021-11-14'),
('Coat Rack', 45.00, '2021-12-21')
2. The AFTER/FOR SQL Server trigger
The AFTER trigger is meant to fire your custom code after the DML statement is performed. Alternatively, you could use the word “FOR” if you wanted to. The two mean the same thing and are interchangeable. I like to use the word “AFTER” because I think it makes things more clear regarding when this trigger will fire.
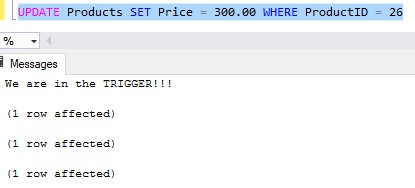
Let’s create an extremely simple trigger that just prints a message every time a user runs an UPDATE statement against our Products table. Here’s the trigger:
CREATE TRIGGER ProductPrint
ON Products
AFTER UPDATE
AS
PRINT 'We are in the TRIGGER!!!'
Pretty simple, right?
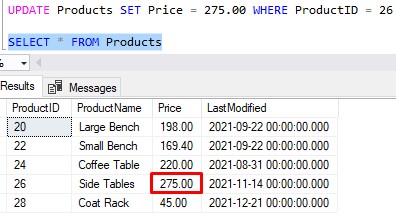
Now let’s run a quick UPDATE statement to change the price of one of our products:
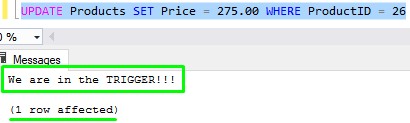
Nice! The change was made to our product, and our trigger fired and displayed our message. If we look at the table, we can see that our change was indeed made:
And again folks, we set up this trigger to fire after UPDATE statements specifically. The trigger would not fire after INSERT or DELETE modification statements.
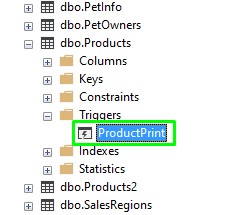
You can see the trigger in the Object Explorer by navigating to the table and expanding the Triggers folder:
3. The INSTEAD OF SQL Server trigger
We use the INSTEAD OF trigger when we want to execute custom code instead of executing a DML statement. Basically we just pump the brakes on whatever DML statement we’re trying to run and instead execute our custom code in our trigger.
We’ll create a very simple INSTEAD OF trigger on the Customers table to print an error message to the user if they try to delete anything in the Customers table:
CREATE TRIGGER DoNotAllowCustomerDelete
ON Customers
INSTEAD OF DELETE
AS
PRINT 'Deletion operations are NOT ALLOWED on the Customers table'
Here’s a DELETE statement against the Customers table (that doesn’t use a WHERE clause 🙁 )
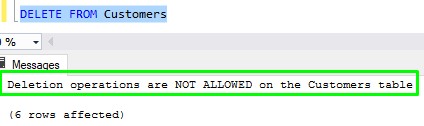
We see our message! Instead of deleting all rows from the table, our trigger ran and just displayed this message to the user.
I’m not crazy about how we still see “6 rows affected“. If we look at the table, we see the DELETE statement in fact did not execute:
This is actually a great example of the power of triggers. This trigger will definitely help maintain the integrity of our data by preventing users from doing something they shouldn’t be doing. It’s perfectly reasonable to tell our users that they cannot delete content from the table. We can go ahead and tell them that, but this trigger enforces that rule in case one of those stupid f*cks forgets.
Again, this particular trigger was set up to fire only after DELETE statements. We can still run INSERT or UPDATE statements against our Customers table, for example.
4. The ‘inserted‘ and ‘deleted‘ tables
One of the greatest things about triggers is their ability to see what is changing. SQL Server uses two very helpful system tables to keep track of data as it’s changing. They are the inserted and deleted tables.
The inserted table tells us what the data is about to be changed to.
The deleted table tells us what the data is being changed from.
When we perform an INSERT into a table, the inserted table will be populated with the data that our new row will have. The deleted table is empty because, well, there’s simply nothing to populate it with. We aren’t coming from an existing row.
When we perform a DELETE against a table, the deleted table contains the data of the row that we are deleting. The inserted table is empty because, well, there’s simply nothing to populate it with!
An UPDATE statement will actually populate both the inserted and deleted tables. The inserted table contains what the row is being changed to. The deleted table contains what the row is being changed from.
Examples of the content in the inserted and deleted tables
Let’s work through an example to demonstrate the content of the inserted and deleted tables. We’ll create two helper tables to actually write out the content of the inserted and deleted tables:
CREATE TABLE InsertedHelperTable
(
SystemTableType VARCHAR(8),
ProductID INT,
ProductName VARCHAR(20),
Price DECIMAL(5,2),
LastModified DATETIME
)
CREATE TABLE DeletedHelperTable
(
SystemTableType VARCHAR(8),
ProductID INT,
ProductName VARCHAR(20),
Price DECIMAL(5,2),
LastModified DATETIME
)
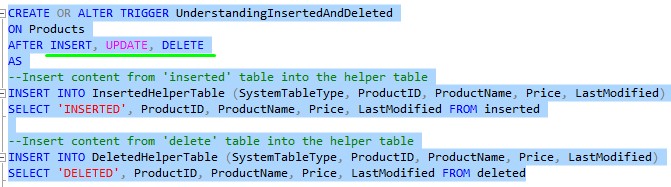
We’ll create an AFTER trigger to populate these helper tables with the content of the inserted and deleted tables after any INSERT, UPDATE, or DELETE operation is performed:
CREATE OR ALTER TRIGGER UnderstandingInsertedAndDeleted
ON Products
AFTER INSERT, UPDATE, DELETE
AS
--Insert content from 'inserted' table into the InsertedHelperTable
INSERT INTO InsertedHelperTable (SystemTableType, ProductID, ProductName, Price, LastModified)
SELECT 'INSERTED', ProductID, ProductName, Price, LastModified FROM inserted

--Insert content from 'deleted' table into DeletedHelperTable
INSERT INTO DeletedHelperTable (SystemTableType, ProductID, ProductName, Price, LastModified)
SELECT 'DELETED', ProductID, ProductName, Price, LastModified FROM deleted
Cool. Let’s remind ourselves what’s in the Products table presently:
Now we’ll do a very simple UPDATE statement to change the price of a product:
There are a few things to point out here. First, we see the text “We are in the TRIGGER!!!“. That’s from the other trigger we created earlier called ProductPrint. I suppose that’s something important to understand: You can have more than one trigger on a table! I’ll go ahead and disable this trigger to make things easier:
ALTER TABLE Products DISABLE TRIGGER ProductPrint
Then we see three “1 row affected” messages. The first one is for the actual UPDATE statement to change the data in the Products table. The other two are generated from the body of the trigger where we perform two INSERT INTO…SELECT statements to populate our helper tables. If you wanted to suppress these informational messages within the body of your trigger (or any other object), you could turn the NOCOUNT flag on.
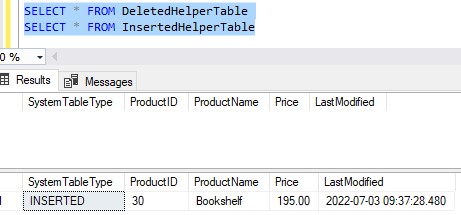
The content of the helper tables:
Let’s take a look at the content in our helper tables:
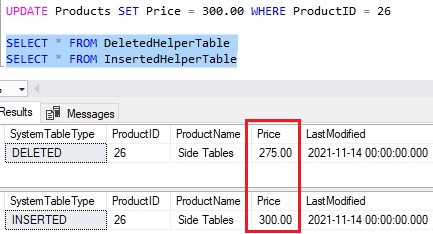
As I’ve said, both the inserted and deleted tables are populated with data after an UPDATE statement. The first result set for DeletedHelperTable shows us the content of the deleted table. This shows us what the data used to be.
The second result set for the InsertedHelperTable shows us the content on the inserted table. This shows us what the data is being changed to.
Each helper table (and in turn each system table) contains only one row because we only modified one row.
You can see how the content in these helper tables checks out. Before we made our change, the price of our product was, indeed, $275.00. After the UPDATE was performed, the price changed to $300.00, which is exactly what we see in our inserted helper tables.
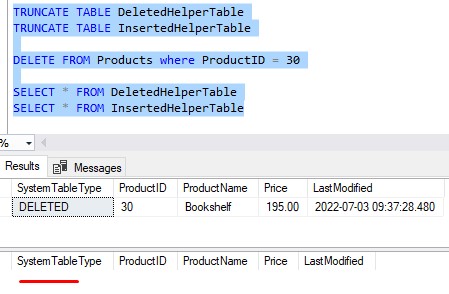
The deleted table is empty upon INSERTS
Let’s truncate the two helper tables to demonstrate the next topic:
TRUNCATE TABLE DeletedHelperTable
TRUNCATE TABLE InsertedHelperTable
As I’ve said, the deleted table will be empty if we run an INSERT statement for our table. Let’s add a new row to the Products table:
INSERT INTO Products (ProductName, Price, LastModified)
VALUES ('Bookshelf', 195.00, GETDATE())
Then take a look at the content of our two helper tables:
Yep, the deleted table is empty!
The inserted table is empty upon DELETES
Likewise, let’s delete that new row and see that the inserted table is empty. We’ll first truncate our helper tables, then perform the DELETE, then see the new content in the helper tables:
Superb! Folks, having access to the new/old data is extremely handy. There are many scenarios where it is great to know what the data is being changed to/from and perform work accordingly. The inserted and deleted tables allow us to do just that!
5. Examples of SQL Server triggers
We looked at some simple examples of SQL Server triggers, but let’s look at some more real-world examples.
Before we get into it, let’s disable all the triggers we’ve created so far:
ALTER TABLE Products DISABLE TRIGGER ProductPrint
ALTER TABLE Products DISABLE TRIGGER UnderstandingInsertedAndDeleted
ALTER TABLE Customers DISABLE TRIGGER DoNotAllowCustomerDelete
Example # 1) Updating the LastModified column of a table automatically
You might have noticed both our Customers and Products tables have a LastModified column. The value in this column is supposed to represent the date and time the row was most recently modified.
Whoever makes a change to a row should make sure they also update the LastModified value. The data in this column is only useful if we make sure we update it after any change.
Instead of hoping that our users remember to update the LastModified value after a modification, we could introduce a trigger to simply update the LastModified value after any UPDATE statement is performed.
Check it out:
CREATE TRIGGER UpdateProductLastMod
ON Products
AFTER UPDATE
AS
UPDATE P
SET P.LastModified = GETDATE()
FROM Products as P
INNER JOIN inserted as i
ON P.ProductID = i.ProductID
Notice we did an UPDATE statement with a JOIN. This basically makes sure all rows we’ve updated get their LastModified value updated.
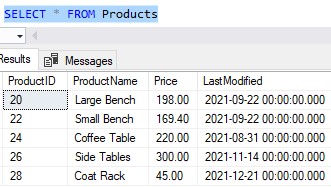
As a reminder, here’s the content of the Products table presently:
Let’s change the prices of two of our products:
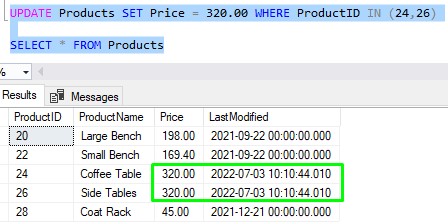
Notice our UPDATE statement did not include an update to the LastModified column. Our trigger took care of that! (I’m writing this on July 3rd 2022 at 10:10 AM)
Again folks, both rows were updated because we did an UPDATE statement with a JOIN to the inserted system table. That’s a very important thing to understand.
We’ll go ahead and delete this trigger:
/*
Cleanup
*/
DROP TRIGGER UpdateProductLastMod
Example # 2) Writing to an audit table
Earlier, we created a trigger to prevent users from deleting content in the Customers table. Let’s say we will allow people to delete customers, but behind the scenes, we’re going to track who is deleting rows and when. In other words, we can use a trigger to basically create an audit of who is deleting rows from our table.
Here’s a simple audit table:
CREATE TABLE CustomerDeletionAudit
(
AuditID INT IDENTITY,
CustomerID INT,
Username VARCHAR(30),
DateOfDeletion DATETIME DEFAULT GETDATE()
)
And here’s the trigger:
CREATE OR ALTER TRIGGER DeletionAudit
ON Customers
AFTER DELETE
AS
DECLARE @custIDdeleted INT
DECLARE @currentUser VARCHAR(30)

SELECT @currentUser = SYSTEM_USER

DECLARE deletionCursor CURSOR
FOR
SELECT CustID FROM deleted

OPEN deletionCursor
FETCH NEXT FROM deletionCursor INTO @custIDdeleted

WHILE(@@FETCH_STATUS = 0)
BEGIN
INSERT INTO CustomerDeletionAudit (CustomerID, Username)
VALUES (@custIDdeleted, @currentUser)

FETCH NEXT FROM deletionCursor INTO @custIDdeleted
END

CLOSE deletionCursor
DEALLOCATE deletionCursor
We use a cursor in the definition of this trigger to iterate through each of the deleted rows and insert their CustID values into the audit table one at a time. Remember folks, you need to make sure your trigger can handle modifying multiple rows at once!
Learn more about cursors: SQL Server Cursors: A How-To Guide
As a reminder, here’s what’s in our Customers table presently:
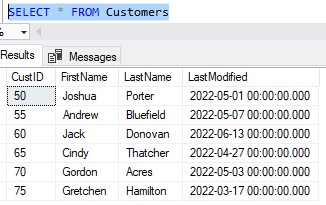
We’ll delete customers # 70 and 75, then check the content in our audit table:
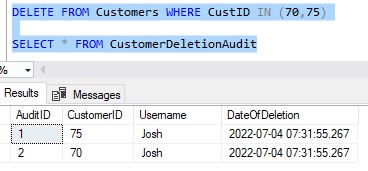
Looks like our user ‘Josh’ has been caught red-handed.
Here’s a quick cleanup statement:
/*
Cleanup
*/
DROP TRIGGER DeletionAudit
DROP TABLE CustomerDeletionAudit
6. Tips, Tricks, and Links
Here is a list of a few helpful tips and tricks you should know when working with SQL Server triggers:
Tip # 1: You can use the UPDATE system function to further restrict your trigger to monitor changes to a specific column
SQL Server has a handy UPDATE function that can be used in your triggers to identify which columns are changing in an UPDATE statement.
And yes, the UPDATE function is different from the UPDATE statement.
Let’s say we want to prevent users from changing a customer’s LastName specifically. They can change anything else if they need to, but we want to keep them from changing someone’s last name. Take a look at the trigger:
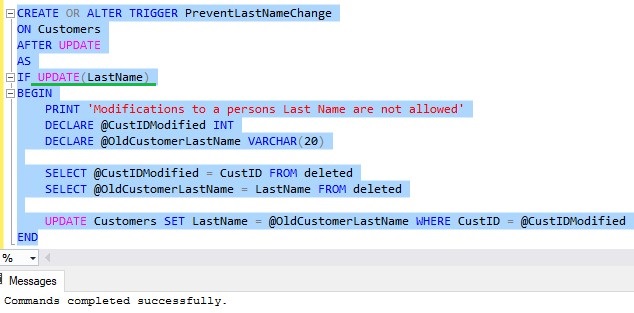
The UPDATE function returns true if the outer UPDATE statement is attempting to change the value of the passed in column. For example, if the outer UPDATE statement is attempting to change the LastName value, the UPDATE function returns true and we print the message saying “Modifications to a persons Last Name are not allowed“. Then we basically undo the work by setting the LastName value back to what it was before (using the handy deleted table!)
Let’s test it out. Here’s the content of the Customers table right now:
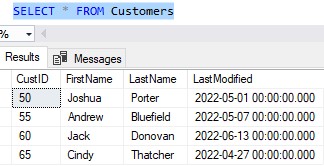
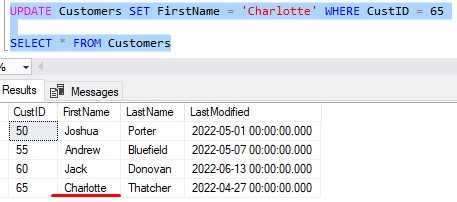
Let’s change the FirstName value for Customer # 65:
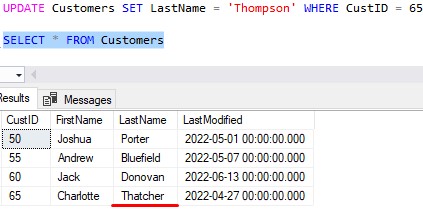
Ok, so far so good. Now let’s try to change her LastName value:
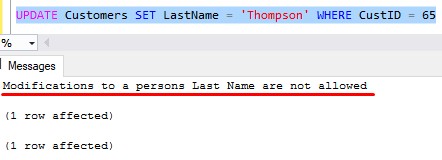
Nice, we see our message! If we look at the content of the Customers table, we see the LastName value did not change (or rather, it did change, but our trigger changed it right back):
Superb!
Clean things up:
/*
Cleanup
*/
DROP TRIGGER PreventLastNameChange
Tip # 2: Make sure your trigger can handle modifying multiple rows at once
I’ve mentioned this tip a few times in this tutorial, but it’s worth repeating again: Make sure your SQL Server trigger can handle modifying multiple rows at once!
In fact, in Tip # 1, the trigger we created won’t work correctly if we update multiple rows at once. It will only work correctly for singleton updates.
I challenge you to test that out, then see what can be done to fix it 🙂
Tip # 3: Your trigger can fire after/instead of more than one type of DML statement
I mentioned this earlier too, but it’s worth repeating. We can set up our SQL Server triggers to run after/instead of INSERT, UPDATE, or DELETE statements. Your trigger can run for any combination of these types of DML statements. You would just separate them with a comma in the definition of the trigger.
For example, we created the UnderstandingInsertedAndDeleted trigger earlier to fire for all three DML statements:
Tip # 4: There are other database level and server level triggers
This tutorial discusses DML triggers specifically, but there are other types of triggers we can create at either the database level or the server level. These would be called DDL (Data Definition Language) triggers. Be on the lookout for a full tutorial on those types of triggers soon. For now, here’s the official Microsoft documentation on triggers that talks about DDL triggers: CREATE TRIGGER (Transact-SQL)
Tip # 5: You can disable a trigger by running the DISABLE TRIGGER statement
If you want a trigger to simply stop firing, but you don’t want to completely delete the trigger, you can simply disable it instead. Here’s the syntax:
ALTER TABLE <table-name> DISABLE TRIGGER <trigger-name>
So if we wanted to delete a trigger called PreventLastNameChange that exists for the Customers table, we would run the following statement:
ALTER TABLE Customers DISABLE TRIGGER PreventLastNameChange
Tips # 6: Drop a trigger by running the DROP TRIGGER statement
If you want to delete a trigger, you just need to run the DROP TRIGGER statement. The syntax is different from the DISABLE TRIGGER statement in that you don’t need to outline the table it belongs to:
DROP TRIGGER PreventLastNameChange
Links
There is a great book called T-SQL querying that you should get your hands on. It contains absolutely everything you need to know about querying SQL Server databases, including everything about triggers. You won’t regret owning this book, trust me. I reference it all the time. Get it today!

Next Steps:
Leave a comment if you found this tutorial helpful!
Make sure you download the following FREE Guide:
FREE 1-Page Simple SQL Cheat Sheet on SQL Server DML Triggers!
This guide contains all the key point you need to understand about DML triggers in SQL Server, condensed into a simple 1-page guide. It will be a great resource for you to reference during your career as a database professional. You won’t regret owning this guide. Get it today!
Do you know what a Scalar Valued Function is in SQL Server? Click the link to find out!
Thank you very much for reading!
Make sure you subscribe to my newsletter to receive special offers and notifications anytime a new tutorial is released!
If you have any questions, please leave a comment. Or better yet, send me an email!